Load Balancing a CNAME Record Tutorial
This tutorial will teach you how to load balance requests to a CNAME record for a primary zone hosted by another DNS service provider.
Upon completing this tutorial, you will need to create a CNAME record to the domain associated with your load balancing group.
Load balance requests to an externally-hosted CNAME record by performing the following steps:
- Add a load balancing group.
- Define the system hostname.
- Select the load balancing type.
- Define an IP address.
- Assign a load balancing weight.
- Add a second IP address.
- Create a CNAME record.
- Save the load balancing group.
Step 1: Add a Load Balancing Group
Load balance requests to an externally-hosted CNAME record by creating a load balancing group.
Click Add New from the Route (DNS) page.
Select "Load Balancing" from the Type option.
The Add New dialog box will expand to display load balancing settings.
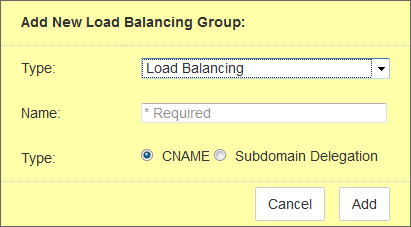
Step 2: Define the System Hostname
The name defined for a load balancing group defines the hostname to which the desired CNAME record should resolve. A system-defined domain (e.g., 0001.edgecastdns.net) will be appended to this hostname.
Set the Name option to "us."

Step 3: Select the Load Balancing Type
The Type option determines whether our name servers will load balance traffic for a CNAME record or a subdomain delegation. An advantage of using a CNAME record is that it can be quickly created through your DNS service provider with minimal effort. Once you have created your load balancing group, all DNS requests to the hostname associated with that CNAME record will be load balanced by our name servers.
Select the CNAME option.
Click Add.
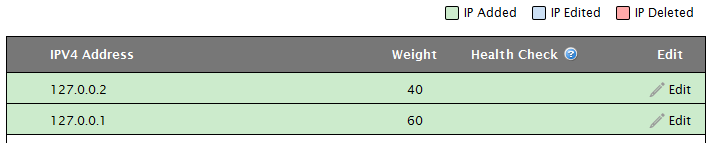
Step 4: Define an IP Address
A basic load balancing group configuration will be displayed. A load balancing group must be associated with at least two IP addresses or CNAME records. This allows our name servers to resolve DNS queries to a CNAME record to the defined set of IP addresses or CNAME records.
Click Add to define an IP address and its weight.

In the Type option, select "IPv4/6" to load balance traffic between several IP addresses.
In the Value option, define the desired IP address to which traffic will be load balanced.

Step 5: Assign a Load Balancing Weight
Our name servers use the weight associated with an IP address/CNAME record to determine the percentage of total traffic that should be served to it. Weight is relative to the sum of the weight for all IP addresses/CNAME records associated with the load balancing group. For example, traffic will be distributed evenly amongst all of them if they are all assigned the same weight, regardless of the actual weight used. In this tutorial, we will configure the first IP address to receive 20% more traffic than the second one.
Set the weight of the first IP address to "60."

Click Add to associate the specified IP address with the load balancing group.
Step 6: Add a Second IP Address
Add a second IP address to which traffic will be load balanced.
Click Add.
Set the Value option to the IP address of another server to which traffic for this CNAME will be served.
Set the Weight option to "40."
Click Add.
The load balancing group should look similar to the following illustration.
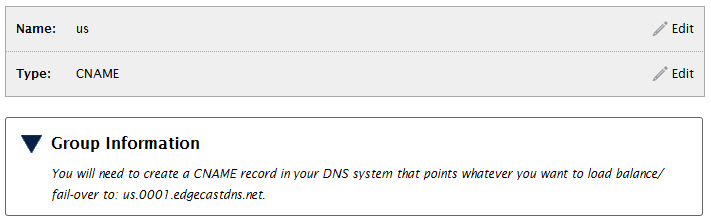
Step 7: Create a CNAME Record
The next step requires that you create a CNAME record through your DNS service provider. This CNAME record must point to the domain (e.g., us.0001.edgecastdns.net) associated with your load balancing group. This domain can be viewed by clicking ![]() to expand the Group Information section.
to expand the Group Information section.
Step 8: Save the Load Balancing Group
A load balancing group will not actually be created until you save it.
Click Submit Group.
Edgecast CDN