A default CDN configuration allows traffic to flow over HTTP. Serving traffic over HTTPS requires a TLS certificateRefers to a certificate that allows you to use the TLS protocol to encrypt traffic between the client and our network for the purpose of delivery over HTTPS. on our network, updating your CDN configuration, and defining a CNAME record via your DNS service provider.
Delivery over HTTPS requires TLS activation and TLS certificates. Contact your CDN account manager for more information.
TLS Certificate Support
Our CDN supports the use of any certificate derived from a Certificate Authority (CA) by allowing you to bring your own certificate to our network. Additionally, you may purchase a TLS certificate that supports multiple Subject Alternative Names (SAN). We support the following levels of validationDetermines the amount of validation that the Certificate Authority will perform to verify a certificate applicant's information before issuing a certificate. for our certificates:
-
Domain Validation (DV)
This validation level only requires proof that you control the domain(s) associated with the certificate. Use a Domain Control Validation (DCV) method (i.e., email or DNS record) to prove your control over those domains.
-
Organization Validation (OV)
In addition to domain validation, OV requires a CA representative to contact/vet your organization and check whether the applicant may use the requested domain(s).
-
Extended Validation (EV)
EV provides the highest level of validation by requiring the CA to perform a rigorous audit to establish identity assurance. Browsers use visual cuesFor example, they may use green in the address bar, a padlock, the site's owner, and "https://" at the beginning of the domain name. to identify sites that leverage an EV certificate. These visual cues provide additional reassurance to your clients that they are accessing a secured site.
Quick Start
Setting up HTTPS delivery involves the following steps:
-
Activate TLS and purchase the desired TLS certificate(s). Contact your CDN account manager for more information.
-
Set up the desired TLS certificate(s).
-
New TLS Certificate
-
Existing TLS Certificate
Submit a previously purchased TLS certificate by providing the intermediate certificate, public key, and the private key via the SSL Certificate Submission page.
-
-
Enable TLS 1.3 (recommended)TLS 1.3 improves security and performance of internet communications. Specifically, it eliminates known TLS 1.2 security vulnerabilities and prevents snooping and man-in-the-middle attacks. and/or 1.2 encryption on your web server(s).
A recommended best practice is to disable support for SSL/TLS versions 1.1 or older.
-
Customer Origin Only
Configure your customer origin configuration for either end-to-end or client to edge encryption.
- Create an edge CNAME configuration that points to a Subject Alternative Name (SAN) defined in the certificate (e.g., common name). Repeat this step as needed.
- Once the TLS certificate has been deployed to our network, wait 6 hours and then verify that the certificate is live.
- Create a CNAME record via your DNS service provider that points a SAN to the certificate's target CNAME. Repeat this step as needed.
TLS Certificate Setup
Setting up a TLS certificate requires performing the following steps:
- Submit a request for a TLS certificate.
-
Prove your control over each Subject Alternative Name (SAN) defined in the certificate via a Domain Control Validation (DCV) method (i.e., email, DNS TXT, or DNS CNAME).
-
OV and EV Certificate
Validate your organization by following the directions provided by the Certificate Authority (CA) via phone or email.
- Wait until the CA has validated your request. After which, your certificate will be issued and installed on our network. Additionally, a target CNAME will be generated
Once a TLS certificate has been installed on our network, you will need to update your edge CNAME configuration and DNS zone before HTTPS traffic may flow through our network. If you plan on serving HTTPS traffic via your web server(s), then you will also need to update your customer origin configuration.
To set up a TLS certificate
- Navigate to the Certificate Provisioning System page.
 How?
How? - Click Add Certificate. The New TLS Certificate wizard will appear.
- From the Certificate Label option, type a unique name that will be assigned to this request for a TLS certificate.
- Skip the Common Name field. This field is auto-populated by the Subject Alternative Name (SAN) option.
-
From the Domain Control Validation (DCV) Method option, select whether you will prove your control over each domain associated with this certificate request through instructions provided within an email, DNS TXT record(s), or DNS CNAME record(s).
Domain control validation through DNS CNAME record(s) is restricted to OV and EV certificates.
-
From the Subject Alternative Name (SAN) option, click Add Domain and then type the desired SAN. Repeat this step as needed.
DV and OV certificates support the use of a wildcard to secure all possible subdomains (e.g., *.example.com). However, this is not allowed for an EV certificate.
- If you have specified multiple SANs, then verify the common name defined in the Common Name option. Assign a different common name by clicking the Is Common Name? option next to the desired domain.
-
From the Validation Level option, select the level of validation that will be performed by the CA.
-
Domain Validation (DV)
Proceed to the next step.
-
Organization Validation (OV)
Provide your organization information in the form that appears in this section. The CA will validate your organization using the provided information.
Fill out this form with care. Misspellings or incorrect information (e.g., unregistered abbreviations) will delay your request until those issues are corrected.
-
Extended Validation (EV)
- Provide organization information in the form that appears in this section. The CA will validate your organization using the provided information.
-
Add one or more contact(s) for the individuals within your organization that are responsible for approving this EV certificate.
Add a contact by clicking + Add Contact from the Additional Contacts section and then filling out all of the fields.
Fill out organization and contact information with care. Misspellings or incorrect information (e.g., unregistered abbreviations) will delay your request until those issues are corrected.
-
-
If you plan on pinning this certificate to an application, then you should disable the Auto renew option. Otherwise, you should verify that the Auto renew option is enabled.
Learn more about:
- Click Submit Request to submit your certificate request to the CA.
-
Check the following domains for CAA records:
-
All of the domains added in step 6 (e.g., images.cdn.example.com).
- The parent domains for all of the domains added in step 6 (e.g., cdn.example.com and example.com).
- The top-level domain (e.g., .com)
If none of the above domains have a CAA record, proceed to the next step. Otherwise, you must issue a DigiCert (CA) CAA record either on the domain(s) defined within the certificate request or the parent domain that has a CAA record.
Example:
Domain CAA 0 issue "digicert.com" -
- Wait approximately 15 minutes for the CA to process your request.
- Open your certificate request by clicking on it from the Certificate Provisioning System page. Verify that you are now on step 3. Domain Validation (DCV).
-
Validate control over your domain according to the DCV selected in the Domain Control Validation (DCV) Method option.
-
Email
Follow the directions for both sets of emails sent by the CA to:
- The registered owner(s) of the public domain as determined by the domain's WHOIS record.
- admin@Domain, administrator@Domain, webmaster@Domain, hostmaster@Domain, and postmaster@Domain.
-
DNS Text
-
Copy a verification token.
- DV certificate: This type of certificate uses a single verification token for all domains. Copy it by clicking Copy from under the Domain Control Validation (DCV) Method option.
- OV or EV certificate: Each SAN defined in your certificate request is assigned a unique verification token. This means that each TXT record created in the next step will use a different verification token. Copy a verification token by finding the desired SAN from under the Subject Alternate Name (SAN) section and then clicking Copy.
-
Create a TXT record for each SAN defined in your certificate request.
Name:
Fully Qualified DomainPrepend _dnsauth. to avoid a conflict with an existing CNAME record.
If you have requested a wildcard certificate, exclude the last level in the domain. For example, if you have requested a wildcard certificate for *.cdn.example.com, then the fully qualified domain for that certificate request would be cdn.example.com..
Value:
Verification TokenExample:
_dnsauth.cdn.example.com. 3600 IN TXT "5gh0lcx2d41n4v673kgfxlrndpd2l1n8"
-
-
DNS CNAME
Each SAN defined in your certificate request is assigned a unique verification token. This means that each CNAME record created within this procedure will use a different verification token.
-
Copy a verification token by finding the desired SAN from under the Subject Alternate Name (SAN) section and then clicking Copy.
-
Create a CNAME record for each SAN defined in your certificate request with the following properties:
- Name: Set it to a SAN-specific verification token.
- Value: Set it to dcv.digicert.com.
-
The CA performs automatic checks for DNS text and DNS CNAME DCVs for up to a week after submitting your certificate request. You may also manually request validation from the CA by clicking Validate.
-
- Once the CA is able to validate your control over the domains defined in the certificate request, your request will proceed to step 4. Other Validations. In this step, the CA performs additional validations including Organization Validation (OV).
-
Extended Validation (EV) and Organization Validation (OV)
In addition to other validations performed by the CA, you will be required to follow the directions provided by DigiCert (CA) via an email to the contact email.
- Once the CA has approved your request, they will issue your certificate. Our CDN service will then install it on our network and generate a target CNAMEIdentifies a system-defined CNAME record through which HTTPS requests will be routed. You must update your DNS configuration to point a CNAME record to this target CNAME.
-
Wait 6 hours and then verify that the certificate is live.
- Dig the certificate's target CNAME. Note the IP address returned by the dig tool.
- Update your hosts file to point the above IP address to a SAN (e.g., common name).
-
Point your browser to:
https://SAN/ -
View the certificate by clicking on the certificate icon that appears in the browser's address bar. Verify that the common name matches the one that you requested.
If the browser returns an error, then the certificate has not been fully deployed. Please wait a few more minutes and then retry.
Adding SANs to an Existing TLS Certificate
Adding one or more SANs to an existing TLS certificateRefers to a TLS certificate that was deployed via CPS. requires domain control validation.
- DV: You must validate control over all of the SANs defined within the TLS certificate.
- OV and EV: You must validate control over the SANs added to the TLS certificate.
Certificate Pinning
The recommended procedure for certificate pinning is to:
- Submit a request for a certificate that you will pin to an application. Make sure that the Auto renew option is disabled.
-
Prior to the expiration of the above certificate, submit another certificate request. Make sure that the Auto renew option is disabled.
The lead time for this step varies according to the length of time required to update all applications to which the first certificate has been pinned.
- Once the second certificate has been fully deployed, update your applications to use the new certificate.
- Repeat steps 2 and 3 as needed.
TLS Certificate Renewals
CPS automatically renews your certificate approximately 60 days prior to expiration when the Auto renew option has been enabled on your certificate request.
Key information:
- By default, we have enabled automatic renewal on all certificates. You may opt-out by disabling the Auto renew option for the desired certificate(s).
- The renewal process may require DCV, EV, and OV revalidation.
Notifications
An email notification may be sent for each of the following events:
- Certificate Renewal: CPS can send an email notification upon manually renewing a certificate. If your certificate is configured to automatically renew, then this notification is sent 60 days prior to its expiration.
- Certification Expiration: CPS can send an email notification 30 and 7 days prior to certificate expiration.
- Pending Validation: CPS can send an email notification for a new certificate that is awaiting validation. The initial notification is sent 24 hours after the creation of the certificate order and a reminder notification is sent after 30 days.
Key information:
- You may define a default notification configuration that is applicable to new certificates and existing certificates for which you have not defined a custom configuration. This default notification configuration determines the types of notifications that will be sent and the set of the recipients for each notification type. Additionally, you may override this notification configuration on a per certificate basis.
- You may only send notifications to an email address associated with a MCC user in your account.
- A certificate request's notification configuration supersedes your default configuration. For example, if you customize who will receive pending validation notifications for a specific certificate, then CPS will only send pending validation notifications for that certificate to the updated list of recipients.
- You may only disable notifications from within your default configuration. If a type of notification should only apply to specific certificate requests, then you should disable it on your default configuration and then enable it on the desired certificate request(s).
To set up a default notification configuration
- Navigate to the Certificate Provisioning System page. How?
- Click Manage Certificate Notifications.
-
Perform the following steps for each type of certificate notification:
- Determine whether a notification will be sent by clicking on its toggle. It is enabled when it looks like this:

-
If enabled, determine who will receive this notification by adding or removing email addresses.
- Add an email address by clicking within that option and then selecting it.
- Remove an email address by clicking on the
 that appears next to it.
- Determine whether a notification will be sent by clicking on its toggle. It is enabled when it looks like this:
- Click Save.
To set up a certificate-specific notification configuration
- Navigate to the Certificate Provisioning System page. How?
- Click on the desired certificate.
-
From the Certificate Notification Settings section, perform the following steps for each type of certificate notification:
-
You may enable a notification by clicking on its toggle. It is enabled when it looks like this:
You cannot disable a notification that has been enabled within your default configuration.
-
If enabled, determine who will receive this notification by adding or removing email addresses.
- Add an email address by clicking within that option and then selecting it.
- Remove an email address by clicking on the that appears next to it.
-
- Click Save.
A certificate request's notification configuration supersedes your default configuration. For example, if you customize who will receive pending validation notifications for a specific certificate, then CPS will only send pending validation notifications for that certificate to the updated list of recipients.
Customer Origin Configuration
This section only applies if you would like to serve HTTPS traffic from your own web servers. This section is inapplicable when setting up HTTPS delivery for CDN storage
A customer origin configuration determines the scheme for communication between:
- The client and the edge of our network.
- The edge of our network and your web server(s).
A prerequisite for delivery over HTTPS requires your customer origin to use the HTTPS scheme when serving content to your clients. This is known as client to edge encryption.
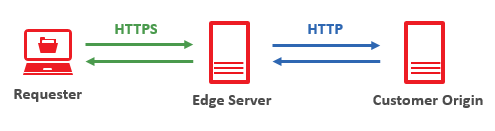
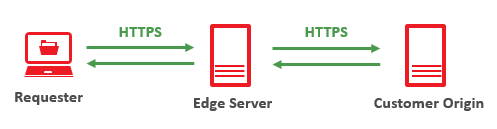
You may configure your customer origin to also use the HTTPS scheme when communicating with your web server(s). This is known as end-to-end encryption.
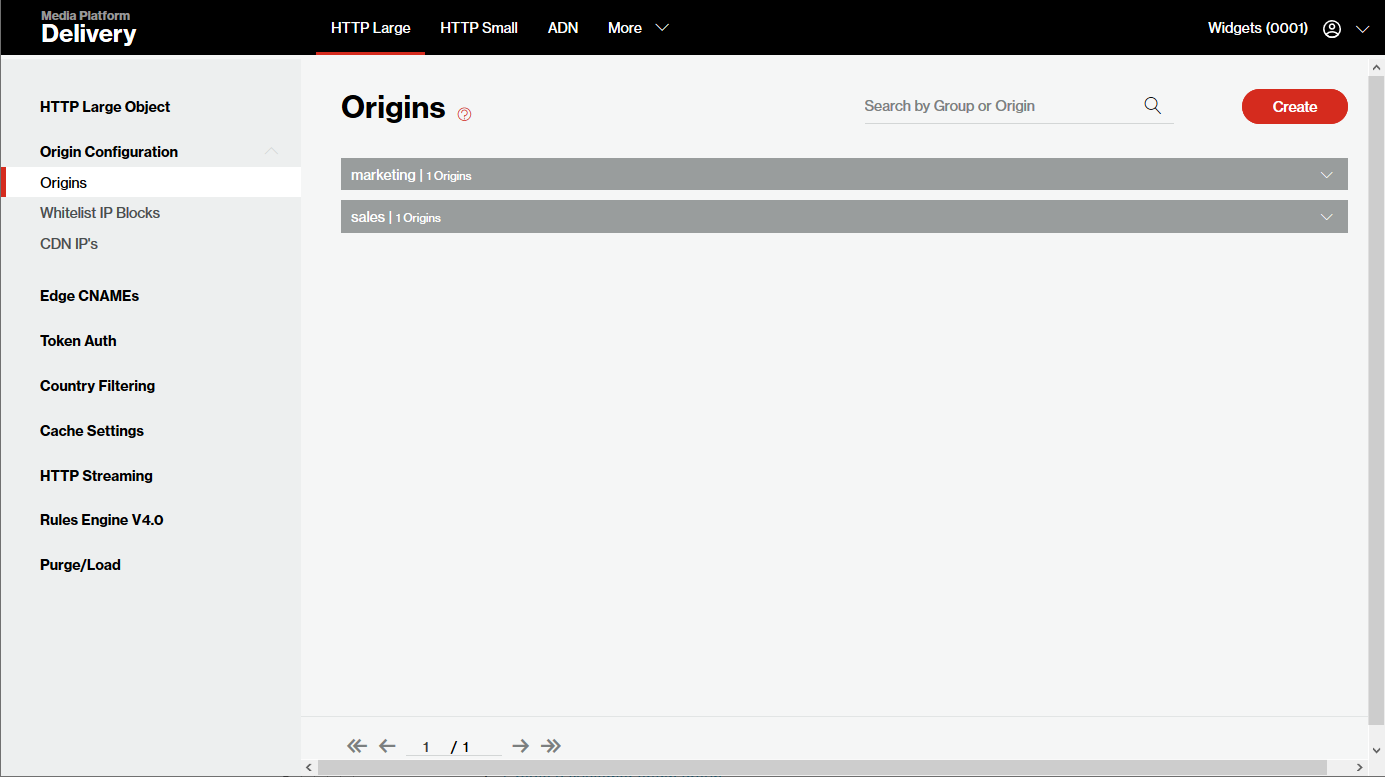
Setting up HTTPS support on your customer origin configuration varies according to whether you are using customer origin groups. Customer origin groups is a new capability. Setup instructions for both customer origin groups and legacy customer origin configurations are provided below.
From the main menu, navigate to
If your account supports customer origin groups, it should look similar to the following illustration:
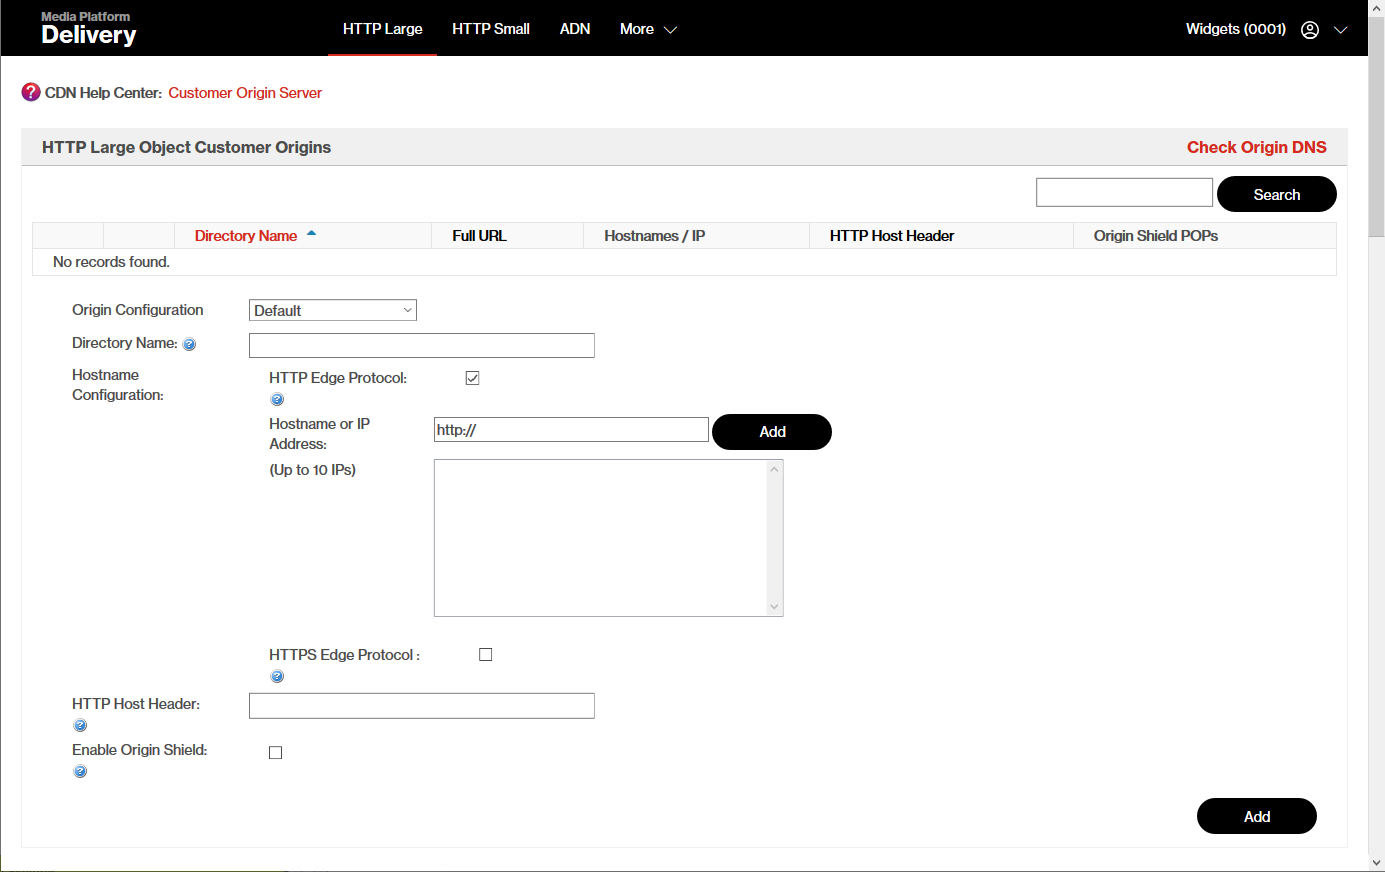
If it still uses the legacy method for customer origin configuration and therefore doesn't support customer origin groups, it will look like the following illustration:
Customer origin groups allow you to leverage our built-in support for connecting to new or preexisting Azure block blob containers. Contact your CDN account manager to upgrade your account to support customer origin groups.
-
Navigate to the Origins page.
How? -
Click on the desired customer origin group to expand it.
Content delivery over HTTPS requires an edge CNAME configuration that points to this customer origin group.
-
Update origin entries to use the HTTPS scheme by performing the following steps:
- From the HTTP - Edge Protocol section, click
 next to the desired origin entry.
 - From the Protocol Type option, set it to HTTPS Only.
- Click Save.
- Repeat the above steps as needed.
The above configuration configures your origin entries to use end-to-end encryption. Alternatively, you may configure an origin entry to only encrypt traffic between the client and our network or to only encrypt traffic when the client submits a HTTPS request.
Learn more. - From the HTTP - Edge Protocol section, click
-
Review your customer origin group's TLS configuration by performing the following steps:
- Click next to the desired origin entry.
- From the Group Settings section, click Origin TLS.
-
Review and adjust how our edge servers perform TLS verification with your origin servers.
- Click Save.
- Click
-
Open the desired customer origin configuration.
How?From the main menu, navigate to  next to the desired customer origin.
Content delivery over HTTPS requires an edge CNAME configuration that points to this customer origin.
- Optional. Disable the use of the HTTP scheme for client to edge communication by clearing the HTTP Edge Protocol option.
- Enable the HTTPS Edge Protocol option.
-
Configure this option using one of the following methods:
-
End-to-End Encryption: Specify one or more HTTPS hostnames/IP addresses under the HTTPS Edge Protocol option.
Sample Configuration:
https://video.mydomain.com
https://101.10.20.30
-
Client to Edge Encryption: Specify HTTP hostnames/IP addresses under the HTTPS Edge Protocol option.
Sample Configuration:
http://video.mydomain.com
http://101.10.20.30
-
- Click Update to save your changes.
Edge CNAME Configuration
Create or update an edge CNAME configuration for each Subject Alternative Name (SAN) defined in the certificate (e.g., common name).
To set up an edge CNAME for use with a TLS certificate
-
Navigate to the Edge CNAMEs page
How? -
In the New Edge Cname option, type the desired SAN.
This hostname should be specified in lower-case letters and should not include a protocol (i.e., http://).
- In the Points To option, select whether the edge CNAME will point to a customer origin or CDN origin server.
-
In the Origin Directory option, select one of the following:
- CDN Origin: Select whether the edge CNAME will leverage our CDN storage solution for standard HTTPS requests (i.e., /00ANThis term represents your customer account number (e.g., 0001) which can be found in the upper right-hand corner of the MCC.) or on-demand streaming.
- Customer Origin: Select the desired customer origin configuration (/80ANThis term represents your customer account number (e.g., 0001) which can be found in the upper right-hand corner of the MCC./customeroriginIdentifies a customer origin configuration by its directory name.).
If you point it to a customer origin, then please verify that it has been updated to leverage HTTPS.
- Click Add.
Traffic may only be delivered via this edge CNAME configuration once your DNS has been updated. Delivery over HTTPS requires a CNAME record that points a SAN to the certificate's target CNAMEIdentifies a system-defined CNAME record through which HTTPS requests will be routed. You must update your DNS configuration to point a CNAME record to this target CNAME..
Customer-Provided TLS Certificates
The following information is only applicable if you would like to leverage a TLS certificate purchased directly from a CA to serve HTTPS traffic over the CDN. The recommended approach for HTTPS content delivery is to request a TLS certificate
A prerequisite for submitting a TLS certificate is to contact your CDN account manager. Your CDN account manager will enable the SSL Certificate Submission page (Tools menu | SSL Certificate Submission). Use this page to submit a TLS certificate by providing the following items:
| Item | Description |
|---|---|
|
Intermediate Certificate |
An intermediate certificate is provided by a CA. More Information: An intermediate certificate proves ownership over a public key and establishes a chain of trust through which the requester's device can verify that the TLS certificate can be traced back to a trusted source (i.e., Root CA). In other words, it proves that your chosen CA is trusted by one of the root CAs. The use of an intermediate certificate is one of the security measures taken by CAs to ensure the integrity of the keys used by root certificates. |
|
Public Key |
A certificate containing a public key is provided by a CA. A public key allows a requester to verify the TLS certificate's digital signature. |
|
Private Key |
A private key should be stored on the server where the CSR was generated. This private key allows the server to encrypt/decrypt communication with the client. |
PEM Format
Please provide certificate and keys in PEM format.
Key information:
- Submitting a certificate or key in a different format will generate an error.
- Run the following OpenSSL command to check whether the certificate is in PEM format. This command will return an error if the certificate is in a different format.openssl x509 -in CertificateName.crt -text -noout
-
Useful OpenSSL commands, including how to convert a certificate into PEM, can be found on the following web page:
https://www.sslshopper.com/article-most-common-openssl-commands.html
- If you do not wish to convert your certificate to PEM format, then it will need to be submitted using a different method that may not offer the same level of security. For more information, please contact your CDN account manager.
To submit a TLS certificate
-
Gather the following items:
- Intermediate certificate
- Public key
- Private key
-
Perform the following:
-
Verify that the PEM-encoded public key certificate matches the private key.
-
Verify that the CA signed the public key certificate.
-
- Open the intermediate certificate provided by the CA in a text editor.
-
Navigate to the SSL Certificate Submission page. If this page is unavailable, please contact your CDN account manager.
How? -
Copy and paste the intermediate certificate into the Intermediate Certificate option.
View a sample intermediate certificate.
-----BEGIN CERTIFICATE-----
MIIDCTCCAfGgAwIBAgIJAPKeHhFoo9UvMA0GCSqGSIb3DQEBBQUAMBsxGTAXBgNV
BAMMEHd3dy5teWRvbWFpbi5jb20wHhcNMTQxMTE3MjAyMjMxWhcNMjQxMTE0MjAy
MjMxWjAbMRkwFwYDVQQDDBB3d3cubXlkb21haW4uY29tMIIBIjANBgkqhkiG9w0B
AQEFAAOCAQ8AMIIBCgKCAQEAzTaxMLbRdvdTiRmaVt8RMDweKfYBWhe3i3VsloVd
4jGEFBtH1bAlbfN/S4hRH5F28h1Ga1Unh/LeeFnKS9ZH0CHazrA6Ug+CyqENdQ3M
OjvHn6VHLxMC5nVhoPkBlTVPGGtceZh0AsAT+H8mW4xgzGON9hq9yUpLIuHwVkMx
lcmIc0pn9QIbPyQz5fOvVBGEZJ+NbUjYDp6ByHJFUme9ONm41aq47tG4rXLWf7wl
0C5uhUIKhcw+XT88GCxwVjANoDVnc1fMVFsFt9ogfQ7uX3TK/R9Rn/Jh7zmoxXOj
Mb0Tfzc/CeWnBh3C4MXAXeHXVFcMkHR6EGwq+5esGqt0rQIDAQABo1AwTjAdBgNV
HQ4EFgQUkIfpiCBm61RL5ahAR1jBOkGSfmowHwYDVR0jBBgwFoAUkIfpiCBm61RL
5ahAR1jBOkGSfmowDAYDVR0TBAUwAwEB/zANBgkqhkiG9w0BAQUFAAOCAQEAhFJ5
B4HM8ReYqestuv/D21ZgUq8BpWpqqI8bdptnz+GFEEPtu2tDoAWDNDaPjMZF7x6G
2oz75+sdiio9lMtDOFulZxXHa4kcWZkmhB86VLaFHcBWVojQKi3rcT+8hsPX0pG4
sHa1oGo7E83yyaNmbBKya9U13jCZHdbppA2iOUJZ+5Kz9K6mHmKTX1dOo2u+hfHR
2hI1MLELMpD3IEGwlp0HmorgwwCXW1tW7Y8dgtM9XR2G7CkF4Q8551rwDOhv1ghE
DTgFbRAwtKc+SZ23NSreej+SuPTJPc+Go66X+bT/22h5sfQaE9PyL3FtqGaIskfT
+Amj8JQ5Rpi3vrdiLw==
-----END CERTIFICATE-----
- Open the public key certificate provided by the CA in a text editor.
-
Copy and paste the public key certificate into the Public Key option.
View a sample public key certificate.
-----BEGIN CERTIFICATE-----
MIIDCTCCAfGgAwIBAgIJAPKeHhFoo9UvMA0GCSqGSIb3DQEBBQUAMBsxGTAXBgNV
BAMMEHd3dy5teWRvbWFpbi5jb20wHhcNMTQxMTE3MjAyMjMxWhcNMjQxMTE0MjAy
MjMxWjAbMRkwFwYDVQQDDBB3d3cubXlkb21haW4uY29tMIIBIjANBgkqhkiG9w0B
AQEFAAOCAQ8AMIIBCgKCAQEAzTaxMLbRdvdTiRmaVt8RMDweKfYBWhe3i3VsloVd
4jGEFBtH1bAlbfN/S4hRH5F28h1Ga1Unh/LeeFnKS9ZH0CHazrA6Ug+CyqENdQ3M
OjvHn6VHLxMC5nVhoPkBlTVPGGtceZh0AsAT+H8mW4xgzGON9hq9yUpLIuHwVkMx
lcmIc0pn9QIbPyQz5fOvVBGEZJ+NbUjYDp6ByHJFUme9ONm41aq47tG4rXLWf7wl
0C5uhUIKhcw+XT88GCxwVjANoDVnc1fMVFsFt9ogfQ7uX3TK/R9Rn/Jh7zmoxXOj
Mb0Tfzc/CeWnBh3C4MXAXeHXVFcMkHR6EGwq+5esGqt0rQIDAQABo1AwTjAdBgNV
HQ4EFgQUkIfpiCBm61RL5ahAR1jBOkGSfmowHwYDVR0jBBgwFoAUkIfpiCBm61RL
5ahAR1jBOkGSfmowDAYDVR0TBAUwAwEB/zANBgkqhkiG9w0BAQUFAAOCAQEAhFJ5
B4HM8ReYqestuv/D21ZgUq8BpWpqqI8bdptnz+GFEEPtu2tDoAWDNDaPjMZF7x6G
2oz75+sdiio9lMtDOFulZxXHa4kcWZkmhB86VLaFHcBWVojQKi3rcT+8hsPX0pG4
sHa1oGo7E83yyaNmbBKya9U13jCZHdbppA2iOUJZ+5Kz9K6mHmKTX1dOo2u+hfHR
2hI1MLELMpD3IEGwlp0HmorgwwCXW1tW7Y8dgtM9XR2G7CkF4Q8551rwDOhv1ghE
DTgFbRAwtKc+SZ23NSreej+SuPTJPc+Go66X+bT/22h5sfQaE9PyL3FtqGaIskfT
+Amj8JQ5Rpi3vrdiLw==
-----END CERTIFICATE-----
- Open the private key in a text editor.
- Copy and paste the private key into the Private Key option.
- Click Submit.
To verify that the public key certificate and the private key match
-
Run the following two OpenSSL commands.
openssl x509 -noout -modulus -in CertificateName.crtReplace this term with the public key certificate's file name. | openssl md5
openssl rsa -noout -modulus -in private.keyReplace this term with the private key's file name. | openssl md5
- Verify that the above two commands generate the same result.
To verify that the CA signed the public key certificate
Run the following command:
Consider the public key certificate verified when the above command returns OK. All other results indicate that the public key certificate has not been properly signed.
To verify the public key certificate's attributes
Run the following command to verify the certificate's common name and issue\expire
More Information
Edgecast CDN