Live Slicer Health Notifications via Amazon SNS
Live Slicer health data may be made more widely available through the following workflow:
-
A Live Slicer pushes health data to Amazon SNS whenever one of the following conditions occur:
-
An alert is generated for a key metric.
An alert is generated whenever the status of a monitored metric changes from "Healthy" to either "Warning" or "Critical."
- The status of a key metric resumes "Healthy" status.
-
- Amazon SNS broadcasts Live Slicer health data to one or more destination(s) (e.g., mobile device, web server, or Slack).
Get started with Amazon SNS for free through its SNS free tier.
Learn more.
The Live Slicer formats health data using JSON. This data may then be filtered via custom code. This article explains how to strip out additional data generated by Amazon SNS via a custom function in Amazon Lambda.
Quick Start
Perform the following steps to set up Live Slicer health notifications:
-
Configure health monitoring for the desired Live Slicer.
Live Slicer health data may only be sent for metrics that are being monitored. For example, a custom monitoring configuration may be used to turn off monitoring and health notifications for one or more metrics for a particular Live Slicer.
-
Our service pushes Live Slicer health and failover notifications to the same Amazon SNS topic.
- Configure the Live Slicer to push health notifications to an Amazon SNS topic.
-
Configure Amazon SNS to broadcast health notifications to the desired destination(s).
This article explains how to set up Amazon SNS and Lambda to broadcast health notifications to a Slack channel.
Setting up an Amazon SNS Topic
Amazon SNS communicates with publishers and subscribers through a "topic." For this purpose of this article,
Our service pushes Live Slicer health and failover notifications to the same Amazon SNS topic.
Amazon SNS may be configured to broadcast data to multiple types of subscribers (e.g., web server, mobile device, email, etc.).
Perform the following steps to create a topic:
- Sign in to the Amazon AWS Management console. If you don't have an AWS account, then sign up for one.
- Open the Amazon SNS console.
-
Click Get started.
Amazon SNS may require Amazon SES (i.e., Amazon Simple Email Service). Please sign up for the Amazon SES service if an error message appears within the SNS dashboard.
-
From the upper-right hand corner, change your location to:
US West (Oregon) us-west-2 - Click Topics from the side navigation pane.
- Click Create topic.
-
Click Standard.
Our service does not support pushing notifications to a First-In-First-Out (FIFO) topic.
- In the Name option, assign a unique name (e.g.,
- Optional. If notifications will be sent over SMS notifications, then set the Display name option to the desired name.
- Expand the Access policy section.
-
From the Define who can publish messages to the topic option, select Only the specified AWS accounts.
Set the Only these AWS users option to our AWS account ID:
545191325524 - Click Create topic.
- Copy the topic's ARN.
Configuring Live Slicer Communication with Amazon SNS
Both of the following configurations must be defined before the Live Slicer will push health information to Amazon SNS:
- Create a notification profile that determines when SNS push notifications will be triggered.
-
Assign the above notification profile to each desired Live Slicer.
- Navigate to the Live Slicer Monitoring dashboard.
 How?
How? - From the Saved Views option, select a Slicer View that contains the desired Live Slicer.
- Click on the desired Live Slicer.
- From the right-hand pane, set the Active Notification Profile option to the notification profile created in step 1.
- Navigate to the Live Slicer Monitoring dashboard.
-
Define the ARN topic to which Live Slicer health and failover notifications will be sent.
- Set the SNS topic
-
Navigate to the Notifications page.
How? - Click Update SNS Topic from the right-hand pane.
- Set the Update your SNS Topic ARN option to the ARN for the topic created above.
- Click Save Topic ARN.
Integrating Slack with Amazon SNS
Amazon SNS can broadcast notifications to different subscribers (e.g., mobile devices) using a variety of delivery methods (e.g., HTTP, email, AWS Lambda, etc.).
The configuration that has been performed up to this point allows the Live Slicer to send notifications to Amazon SNS. This section explains how to push those notifications from Amazon SNS to a Slack channel. Integrating Amazon SNS involves the following steps:
- Set up a Slack webhook.
- Create an Amazon Lambda function that subscribes to the Amazon SNS topic.
Setting up a Slack Webhook
Slack requires that a webhook be created before it will post messages from external sources (e.g., Amazon SNS).
Learn how to create a Slack webhook.
Subscribing to a SNS Topic via Amazon Lambda
Amazon SNS needs to be informed of the above webhook before it can send data to a Slack channel. This task may be performed via Amazon Lambda. Amazon Lambda is a compute service that runs code in response to events (e.g., when data is pushed from a Live Slicer to Amazon SNS).
View Amazon Lambda's documentation.
This article creates a Lambda function in Python that performs the following tasks:
- Subscribes to a SNS topic.
- Identifies the Slack webhook through which it will post messages to a Slack channel.
- Strips out data added by Amazon SNS.
Add custom code to this function to tailor how messages are posted to a Slack channel (e.g., filter notifications by Live Slicer).
Perform the following steps to create a Lambda function:
- Open the Amazon Lambda console.
- Click Get Started Now.
- Click Blank Function.
-
Click the dashed box and then select "SNS" as the trigger for this function.
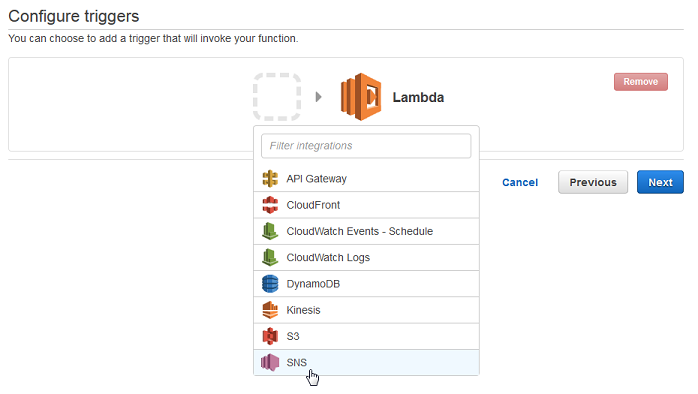
- Verify that the SNS topic created earlier in this article is selected in the SNS topic option.
- Mark the Enable trigger option.
- Click Next.
-
Configure the Lambda function as follows:
- Name: Set the Name option to the name of the function (e.g., forward_to_slack).
- Description: Set the Description option to a brief description for the purpose of the function (e.g., Send Live Slicer information to a Slack channel.).
- Runtime: Set the Runtime option to "Python 2.7."
-
Code: Set the Lambda function code option to the following code:
import json
import urllib2

def forward_to_slack (event, context):
    # The URL for your Slack Channel's webhook
    url = "https://hooks.slack.com/services/ABCDE1234/FGHIJ5678/KLMNOPQRSTUV901234567890"

    # Format the message
    try:
        # Try to navigate to the Message that was sent via SNS and strip out the
        #  rest of the delivery information
        slack_data = {"text":str(event['Records'][0]['Sns']['Message'])}
    except:
        slack_data = {"text":str(event)}

    # Dump the json to prepare it for sending
    data = json.dumps(slack_data)

    # Create the request
    req = urllib2.Request(url, data)

    # Send request
    urllib2.urlopen(req)
Update the webhook URL defined in the code to point to the one copied in the Setting up a Slack Webhook section.
-
Handler: Set the Handler option to "lambda_function." and then append the name of the function defined in the Name option (e.g., lambda_function.forward_to_slack).
-
Role: Set the Role option to "Create new role from template(s)."
-
Role name: Set the Role name option to the name that will be assigned to the new role (e.g., lambda_basic_execution).
-
Click Next.
-
Amazon Lambda will now allow you to review the function that will be created. Verify that the correct SNS topic has been selected and that the Lambda function configuration looks similar to the following illustration:
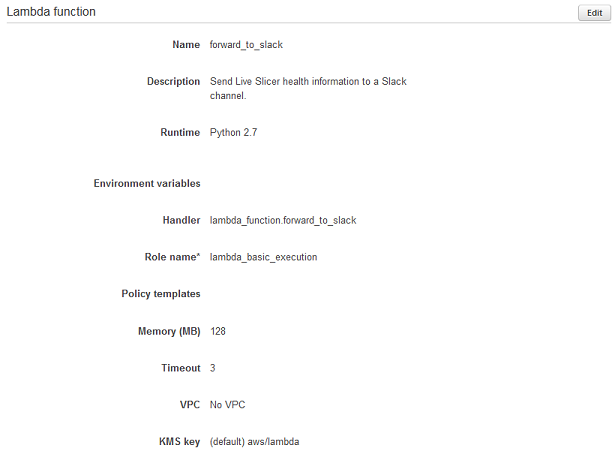
-
Click Create function.
Amazon Lambda will now automatically post
Live Slicer Health Notification Data Format
Once an alert is triggered or upon resuming "Healthy" status, a Live Slicer sends information that describes the change in JSON format. Each parameter sent in this health notification is described below.
| Parameter | Description |
|---|---|
|
slicer_owner_username |
Indicates the email address through which the Live Slicer authenticates to the system. This email address is defined by the username setting in the Live Slicer configuration file (i.e., uplynk.conf). |
|
old_metric_health |
Indicates the state of the metric identified by the metric_name parameter prior to this change in status. Valid values are:
|
|
metric_critical_threshold |
Indicates the threshold that must be met before the metric identified by the metric_name parameter enters a critical state. This threshold is defined in the monitoring rule assigned to the Live Slicer. The syntax for this field varies by metric. A few sample values are provided below.
|
|
current_metric_health |
Indicates the current state of the metric identified by the metric_name parameter. Valid values are:
|
|
slicer_current_health |
Indicates the current health of the Live Slicer defined in the slicer parameter. Valid values are:
|
|
slicer |
Indicates the name of the Live Slicer that pushed the current health notification. |
|
metric_warning_threshold |
Indicates the threshold that must be met before the metric identified by the metric_name parameter enters a warning state. This threshold is defined in the monitoring rule assigned to the Live Slicer. The syntax for this field varies by metric. A few sample values are provided below.
|
|
current_metric_value |
Indicates the metric's value at the time defined by the utc_time parameter. The syntax for this field varies by metric. A few sample values are provided below.
|
|
utc_time |
Indicates the date and time (UTC) at which the change in metric health took place. Syntax: YYYY-MM-DD hh:mm:ss.ffffff
Sample value: 2017-01-16 19:40:53.605533
|
|
metric_name |
Identifies the metric that triggerred the change in Live Slicer health. View a list of monitoring metrics and their definitions. |
Sample Live Slicer Health Notification Data
The following sample data indicates that the Live Slicer's signal was restored allowing it to resume "healthy" status.
{
	"slicer_owner_username": "joe@mycompany.com",
	"old_metric_health": "critical",
	"metric_critical_threshold": null,
	"current_metric_health": "healthy",
	"slicer_current_health": "healthy",
	"slicer": "MySlicer",
	"metric_warning_threshold": null,
	"current_metric_value": "TS unicast :1234 1920x1080",
	"utc_time": "2017-01-16 19:35:49.105642",
	"metric_name": "Signal Status"
}