Azure Block Blob Storage
Serve content stored from an Azure block blob container via the CDN by performing the following steps:
-
Prepare for HTTPS delivery by requesting a TLS certificate
-
Create a customer origin group that either generates a new Azure block blob container or points to an existing one.
A customer origin group maps your origin (e.g., Azure block blob) to a CDN URL through which your content may be served. A CDN URL consists of a system-defined base URL followed by the relative path to your content.
-
Create an edge CNAME configuration.
Use an edge CNAME configuration to serve traffic via the CDN without having to update your links. This type of configuration maps a customer origin group to a CNAME recordA Canonical Name (CNAME) record is used to indicate that a hostname is an alias of another hostname. A CNAME record must be registered on a Domain Name System (DNS). This term should not be confused with edge CNAME..
-
Upload the desired content to your Azure block blob container.
Key information:
- Each customer origin group is specific to a platform.
- The maximum number of customer origin groups
- Traffic for an Azure block blob container is always served over HTTPS.
-
A list of origin groups are provided on the
Clear a search by clicking the x or searching for a blank value.
 View a sample search scenario.
Searching for "cdn" would include all of the following results:
- cdn
- mycdn
- cdn2
It would exclude all of the following results:
- CDN
- myCdn
- You should not store personally identifiable informationExamples of PII are: name, Social Security number, passport number, and IP address. (PII) within an Azure block blob container connected to our CDN.
Creating a Customer Origin Group
This section provides step-by-step instructions on how to create a customer origin group.
Key information:
-
Create a customer origin group that either generates a new Azure block blob container or points to an existing one.
-
New Container: Assign a name for the container that will be created within our Azure storage account and then select the location closest to your audience.
A customer origin group created for a new Azure block blob container cannot be modified. However, you may always regenerate the Shared Access Signature (SAS) URI associated with it.
-
Existing Container: Identify the desired container by specifying the name of your Azure storage account, the name of your Azure block blob container, and the location where it was created. Additionally, you will be required to authorize our access by providing either a Shared Access Signature (SAS) token (recommended) or access keys.
Specifying a location other than the one in which it was created will result in the creation of a new Azure block blob.
-
- It may take up to a minute after the creation of a new customer origin group before it is listed on the Origins page.
- It may take up to 45 minutes after the creation of an Azure block blob container before you may start serving traffic via the CDN from it.
- The maximum number of customer origin groups per platform is 100.
To create a customer origin group for a new Azure block blob container
- Navigate to the Origins pageHow?
- Click Create.
- Click Azure Blob. By default, the Create Account tab will be selected.
-
In the Name option, specify a name that consists of 3 to 15 lowercase letters and numbers. This name will be assigned to the customer origin group and to the Azure block blob container being created.
This name will be incorporated into the CDN URL (e.g., http://wpc.0001.edgecastcdn.net/800001/Customer Origin Group).
- In the Location option, select the location closest to the majority of your users.
- Click Save.
- Request a TLS certificate through the Certificate Provisioning System for the domain through which you will serve traffic for this Azure block blob container.
- Create an edge CNAME configuration that points the domain identified in the previous step to the customer origin group created in this procedure.
To create a customer origin group for an existing Azure block blob container
- Navigate to the Origins pageHow?
- Click Create.
- Click Azure Blob.
- Click the Bring Your Own tab.
-
In the Origin Name option, type the name of the Azure storage account that owns the desired Azure block blob container. This name will be assigned to the customer origin group being created.
This name will be incorporated into the CDN URL (e.g., http://wpc.0001.edgecastcdn.net/800001/Customer Origin Group).
- In the Container Name option, specify the name of your existing Azure block blob container.
- In the Location option, select the location where the Azure block blob container identified in the previous step is housed.
-
In the Access Type option, select how you will authorize access to the specified Azure block blob container. Choose from either of the following options:
-
Access Key: Set the Access Key option to the key1 token and the Backup Key option to the key2 token.
-
SAS Token: Set the SAS Token 1 and SAS Token 2 options to your SAS tokens.
A shared access signature (SAS) provides delegated access to resources in your Azure storage account. This allows access to resources in your Azure storage account without having to sharing your access keys.
How do I generate SAS tokens?
- From the Azure portal, navigate to the desired storage account.
-
From the navigation pane on the left-hand side, select Shared access signature.
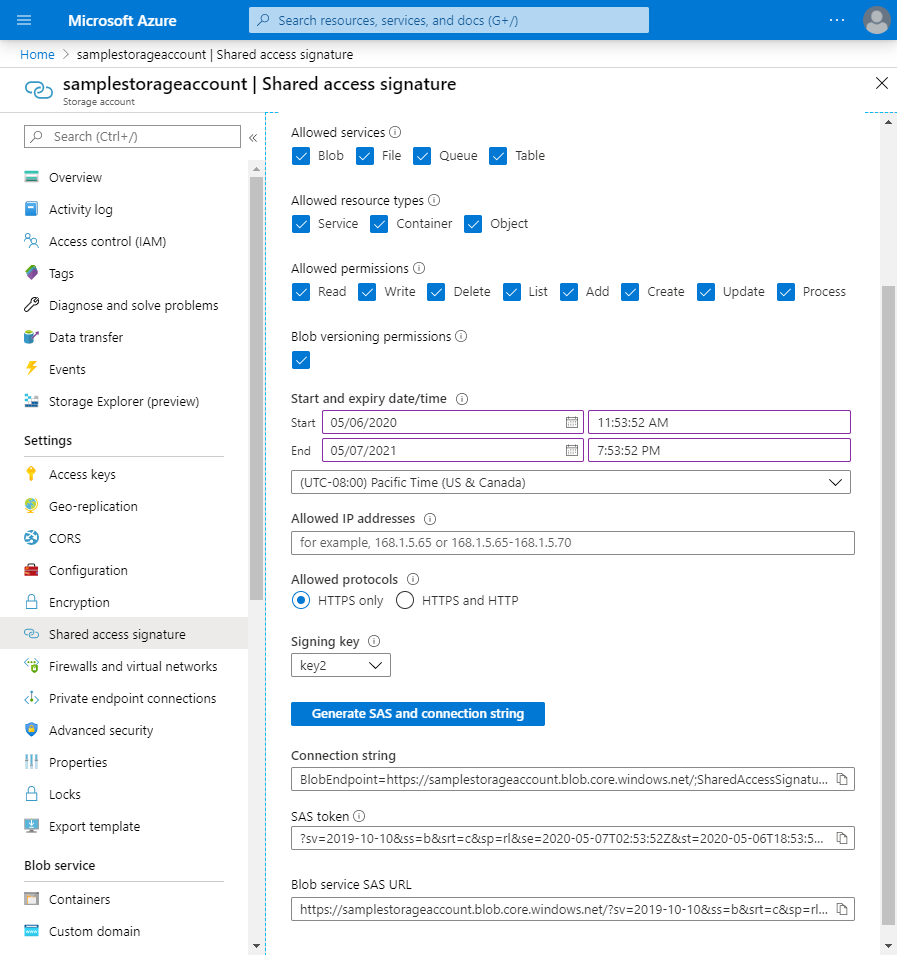
-
Grant all services, resource types, and permissions. Also, set an expiration date (e.g,. 1 year from now).
- Click Generate SAS and connection string.
- Copy the SAS token and paste it in the SAS Token 1 option.
- From the Signing key option, select key 2.
- Click Generate SAS and connection string.
- Copy the SAS token and paste it in the SAS Token 2 option.
-
- Click Save.
- Request a TLS certificate through the Certificate Provisioning System for the domain through which you will serve traffic for this Azure block blob container.
- Create an edge CNAME configuration that points the domain identified in the previous step to the customer origin group created in this procedure.
Authorization Credentials
Our service requires authorization credentials to serve content from an Azure block blob container. Our system automatically manages these credentials for containers created by our service. Alternatively, if your customer origin group points to a container that you created via Azure, then you are responsible for managing your Azure authorization credentials.
Shared Access Signature (SAS)
A SAS grants limited access to Azure storage resources.
-
System-Generated Containers
You must use a Shared Access Signature (SAS) URI when authorizing uploads to Azure block blob containers created by our service.
Perform the following actions:
- View your SAS URIs: Navigate to the Origins page
 . After which, click Show Tokens. Click the Show link for each desired SAS URI.
 - Copy your SAS URI: Click
 next to each desired SAS URI.
 - Generate new SAS URIs: Click Regenerate next to each desired SAS URI.
- View your SAS URIs: Navigate to the Origins page
-
Azure-Generated Containers (Bring Your Own)
The recommend method for authorizing our service to request content from your Azure block blob containers is via a SAS token.
Attempting to authenticate requests to an Azure block blob container using an invalid or expired SAS token may result in a 403 Forbidden response for traffic served via this customer origin group.
Grant all services, resource types, and permissions when generating a SAS token.
Rotate your your SAS token on a regular basis (e.g., yearly). You may use an expiration date to enforce this policy. Update your customer origin group with a new SAS token prior to the expiration of the old one.
Access Keys
You may use your access keys to authenticate to your preexisting Azure block blob containerRefers to an Azure block blob container that was not created by our service.. However, if you regenerate your access keys, then you must also update your customer origin group with the updated access keys.
If a customer origin group is associated with outdated access keys, then traffic served through it may result in a 403 Forbidden response.
Deleting a Customer Origin Group
Permanently delete a customer origin group by deleting all of its origin entries and then deleting the customer origin group.
Deleting a customer origin group for which an Azure block blob container was created will also delete the container. This will not occur when deleting a customer origin group that was configured to connect to a preexisting Azure block blob container.
If an edge CNAME points to a customer origin group, then you will not be allowed to delete its last origin entry. Delete the corresponding edge CNAME configuration and then delete the last origin entry.
It may take up to an hour for customer origin group deletions to take effect.
To delete a customer origin group
- Navigate to the Origins pageHow?
- Click on the desired customer origin group to expand it.
- Hover over the desired origin entry and then click
 . When prompted, click Delete to confirm the deletion of the origin entry.
 - Repeat the previous step until you have deleted all of the origin entries associated with the desired customer origin group.
- Click Create.
- Click Customer Origin.
- Click within the Group option.
- Type the name of the desired customer origin group.
-
Delete the customer origin group by clicking the
 that appears next to it.
If the
icon is unavailable, then you should verify that all of its origin entries have been deleted.
Customer Origin Group Name
The Name/Origin Name option uniquely identifies your customer origin group. This name is included as a URL segment within a CDN URLA system-defined URL that points to a CDN hostname. A CDN URL allows content delivery via our network. Simplify your CDN setup by also creating an edge CNAME configuration which potentially allows you to deliver traffic via the CDN using the same links as your current setup. as indicated below.
Syntax:
Set up a friendlier and shorter URL (i.e., edge CNAME URLThis type of URL takes advantage of an edge CNAME configuration and a CNAME record to provide a friendlier alternative to a CDN URL. An edge CNAME URL is specific to the platform from which it was configured.) by creating an edge CNAME configuration and defining a CNAME record.
Learn more.
The name assigned to your customer origin group cannot be modified.
CDN and edge CNAME URLs are case-sensitive.
Example
If the primary purpose of your web servers is to serve images, then you might create a customer origin group called images. An example of what a CDN URL for this type of customer origin might look like is provided below.
Sample CDN URL:
http://wpc.ANThis term represents your customer account number (e.g., 0001) which can be found in the upper right-hand corner of the MCC..edgecastcdn.net/80ANThis term represents your customer account number (e.g., 0001) which can be found in the upper right-hand corner of the MCC./imagesIdentifies a customer origin group by its directory name.
The above sample CDN URL points to the webroot on the server(s) associated with the images customer origin group. Append the desired relative path to the content that you would like to request. This relative path is highlighted in the following sample CDN URL:
Content Management
Manage your content and block blobs using any of the following tools:
- Azure Storage Explorer
- AzCopy
- Azure PowerShell
- Azure Storage (Blob Service) REST API
- Azure CLI
-
Azure Storage client library for:
Leverage a SAS URI to access your Azure storage account.
Azure Storage Explorer
Azure Storage Explorer provides an intuitive UI to easily upload, download, and manage blobs within your storage account.
- Download and install Azure Storage Explorer from the Azure Storage Explorer page.
- Launch Azure Storage Explorer.
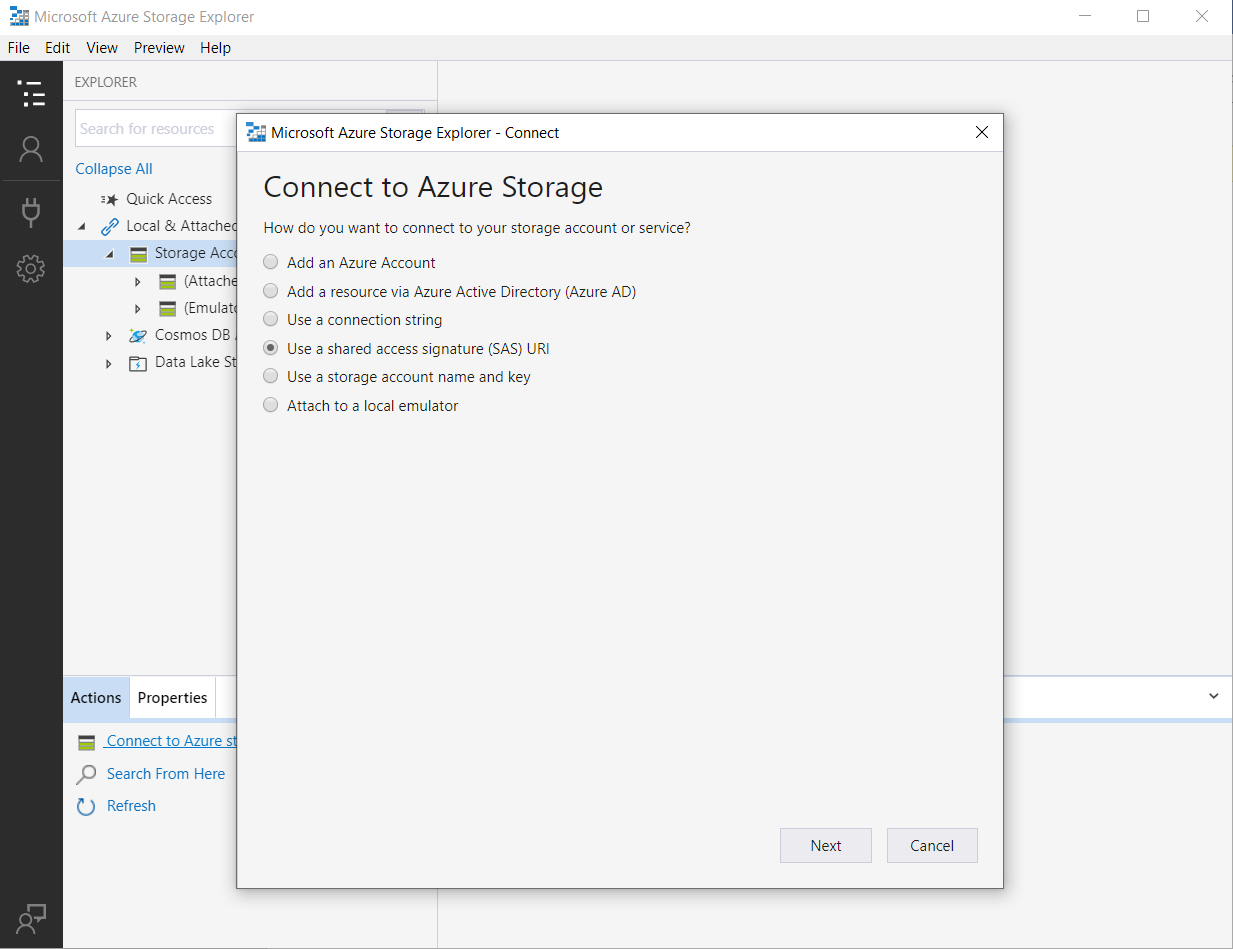
- Select Storage Accounts, click the Actions tab, and then click Connect to Azure storage...
-
From the Connect to Azure Storage dialog box, select the Use a shared access signature (SAS) URI option and then click Next.

-
From within the MCC, copy the desired container's SAS URI.
-
From within Azure Storage Explorer, paste your SAS URI into the URI option and then click Next.
The Display Name option will auto-populate upon pasting your SAS URI.
- From the Connection Summary dialog box, review your connection configuration and then click Connect. Your Azure block blob container will be listed under Local & Attached | Storage Accounts | (Attached Containers) | Blob Containers.
- Upload content by clicking Upload and then selecting either Upload Folder or Upload Files.
Edgecast CDN