Syndication Publishing
Contact your account manager to activate Syndication Publishing.
In addition to streaming content directly to your consumers, you may also simultaneously distribute it to multiple social media and content distribution platforms with minimal effort.
Set up Syndication Publishing by performing the following steps:
- Create a publishing target for each desired social media or content distribution platform.
- Publish to the desired platform(s) by associating the desired publishing target(s) with your
Publishing Target
Distribute your content to any social media or content distribution platform (e.g., YouTube, Twitch, and TikTok) that supports ingest through any of the following protocols:
You may use any of the above protocols to push a live stream to your social media or content distribution platform. Additionally, you may configure your social media or content distribution platform to pull a HLS live stream.
A publishing target configuration determines how your live stream will be published. Setup varies by platform.
| Platform | Description |
|---|---|
|
AWS Elemental MediaConnect |
Provide the following information:
Configure your AWS Elemental MediaConnect's output to use Zixi push. |
|
|
Configure our service to authenticate to Facebook using either of the following methods:
|
|
Pluto TV |
Provide the following information:
|
|
TikTok |
Provide a stream key that authorizes our service to publish to a specific TikTok account. |
|
Twitch |
Provide a stream key that authorizes our service to publish to a specific Twitch channel. |
|
YouTube |
Configure our service to authenticate to YouTube using either of the following methods:
|
|
Custom |
Publish to any social media or content distribution platform using the RTMP, RTMPS, HLS, Zixi, SRT, or RIST protocol. RTMP or RTMPS - Push Stream URL Syntax: Base Stream URL/Stream Key
The desired social media or content distribution platform determines whether a stream key must be defined within your stream URL. Please refer to their documentation for more information. HLS - Push Stream URL Syntax: Base Stream URL/
Sample stream URLs: rtmp://platform.example.com/live/3u40-9rqs-502b-7zeq/ http://platform.example.com/live/ Please refer to the documentation provided by the desired social media or content distribution platform to find out where your stream URL(s) or stream key(s) can be found. HLS - Pull Our service generates a stream URL once you start publishing to this target. You will need to configure the desired social media or content distribution platform to pull the stream using this URL. Zixi - Push Publish a feed to a Zixi-enabled device or service via the Zixi protocol by identifying the destination server and a stream ID. You may also provide a password for password-protected streams. SRT - Push Stream URL Syntax: srt://HostReplace this variable with the hostname of the desired SRT-enabled server or service.:Port
RIST - Push Stream URL Syntax: rist://HostReplace this variable with the hostname of the desired RIST-enabled server or service.:Port
You may only push an audio/video feed to an even port number. RIST reserves odd port numbers (Port+1) for error correction use. |
Contact your account manager to activate Syndication Publishing.
Setting up a publishing target varies by social media or content distribution platform. Expand the section for the platform to which your content will be published.
Perform the following steps to create a publishing target for YouTube:
-
Integrated Authentication Only
Perform either of the following steps if you plan on using
- Create a Clipping profile for
-
Verify that a Clipping profile with a
- Create a Clipping profile for
- Load the Publishing page by navigating to Settings | Publishing.
- Click + New Target to load the Add Publishing Target dialog box.
-
From the Target Name option, assign a unique name to the new publishing target.
The sole purpose of this name is help you to identify this target when publishing content.
-
From the Platform option, select YouTube.
-
Determine whether our service will connect to
-
Stream Key: In the Stream Key option, paste your stream key.
Please refer to
-
Integrated Authentication:
- Enable the YouTube Integrated Authentication option.
-
From the Clipping Profile option, select a Clipping profile whose credentials will be used to authenticate to YouTube.
If the desired Clipping profile is not listed, verify that you have defined a YouTube integration within that Clipping profile.
-
-
Click Save.
Our service will validate your stream key or credentials and attempt to connect to
Perform the following steps to create a publishing target for Facebook:
-
Integrated Authentication Only
Perform either of the following steps if you plan on using
- Create a Clipping profile for
-
Verify that a Clipping profile with a
- Create a Clipping profile for
- Load the Publishing page by navigating to Settings | Publishing.
- Click + New Target to load the Add Publishing Target dialog box.
-
From the Target Name option, assign a unique name to the new publishing target.
The sole purpose of this name is help you to identify this target when publishing content.
-
From the Platform option, select Facebook.
-
Determine whether our service will connect to
-
Stream Key: In the Stream Key option, paste your stream key.
Please refer to
-
Integrated Authentication:
- Enable the Facebook Integrated Authentication option.
-
Enable the Facebook Auto Re-Schedule option to allow our service to create and then publish a new Facebook live event upon reaching Facebook's live event time limit.
Upon reaching Facebook's live event time limit, a new post will be created. Viewers may continue playback by starting that post's live stream.
If this option is disabled, then your live stream will end upon reaching Facebook's live event time limit.
-
From the Clipping Profile option, select a Clipping profile whose credentials will be used to authenticate to Facebook.
If the desired Clipping profile is not listed, verify that you have defined a Facebook integration within that Clipping profile.
- From the Publish to Facebook Page option, select the page on which we will create a post to your live stream.
-
-
Click Save.
Our service will validate your stream key or credentials and attempt to connect to
Perform the following steps to create a publishing target for Twitch or Tiktok:
- Load the Publishing page by navigating to Settings | Publishing.
- Click + New Target to load the Add Publishing Target dialog box.
-
From the Target Name option, assign a unique name to the new publishing target.
The sole purpose of this name is help you to identify this target when publishing content.
- From the Platform option, select Twitch or TikTok.
-
In the Stream Key option, paste your stream key.
Please refer to Twitch or TikTok's documentation to find out where your stream key can be found.
-
Click Save.
Our service will validate your stream key and attempt to connect to Twitch or TikTok. If it is unable to connect, then you should verify the stream key defined in the Stream Key option.
Perform the following steps to create a publishing target for AWS Elemental MediaConnect or Pluto TV:
- Load the Publishing page by navigating to Settings | Publishing.
- Click + New Target to load the Add Publishing Target dialog box.
-
From the Target Name option, assign a unique name to the new publishing target.
The sole purpose of this name is help you to identify this target when publishing content.
- From the Platform option, select AWS Elemental MediaConnect or Pluto TV.
- In the Host option, type the hostname or IP address that points to an AWS Elemental MediaConnect server or Pluto TV server.
- In the Port option, type the port on which the server identified in the previous step listens on.
- In the Stream ID option, type your stream ID.
- Optional. In the Password option, type a password for password-protected streams.
-
Click Save.
Our service will attempt to establish a connection to an AWS Elemental MediaConnect or a Pluto TV server. If it is unable to connect, then you should verify the configuration defined above.
Perform the following steps to create a custom publishing target for RTMP, RTMPS, HLS, Zixi, SRT, or RIST live stream:
- Load the Publishing page by navigating to Settings | Publishing.
- Click + New Target to load the Add Publishing Target dialog box.
-
From the Target Name option, assign a unique name to the new publishing target.
The sole purpose of this name is help you to identify this target when publishing content.
-
From the Platform option, select Custom.
-
From the Protocol option, select the protocol through which your video feed will be transmitted to a social media or content distribution platform.
-
Define how our service will connect to a social media or content distribution platform.
-
RTMP or RTMPS - Push
In the Stream URI option, paste the platform's base stream URL. If the platform requires a stream key, then you should append it to this URL.
If the base stream URL does not include a trailing slash, please append it before pasting the stream key.
Please refer to the documentation provided by the desired social media site to find out where your stream URL(s) and stream key(s) can be found.
Sample RTMP stream URL:
rtmp://platform.example.com/live/3u40-9rqs-502b-7zeq -
HLS - Push
In the Stream URI option, paste the platform's base stream URL.
Syntax:
https://platform.example.com/live/ -
HLS - Pull
Proceed to the next step.
More Information:
Our service generates a stream URL once you start publishing to this target. You will need to configure the desired social media or content distribution platform to pull the stream using this URL.
-
Zixi - Push
- Set up a live stream on your Zixi-enabled device or service.
- In the Host option, type the hostname or IP address for your Zixi-enabled device or service.
- In the Port option, type the port on which your Zixi-enabled device or service is listening.
- In the Stream ID option, type the ID assigned to the stream by your Zixi-enabled device or service.
- Optional. In the Password option, type the stream's password.
-
SRT - Push
Use the following syntax when defining the Stream URI option:
-
RIST - Push
Use the following syntax when defining the Stream URI option:
rist://HostReplace this variable with the hostname of the desired RIST-enabled server or service.:PortYou may only push an audio/video feed to an even port number. RIST reserves odd port numbers (Port+1) for error correction use.
-
-
Click Save.
Our service will validate your stream URL and attempt to connect to the social media or content distribution platform. If it is unable to connect, then you should verify the stream URL and stream key defined in the Stream URI option.
To modify a publishing target
- Load the Publishing page by navigating to Settings | Publishing.
- Click on the desired publishing target.
- Modify the desired settings.
- Click Save.
To delete a publishing target
- Ensure that a live channel or a live event is not publishing to the desired publishing target(s).
- Load the Publishing page by navigating to Settings | Publishing.
- Mark each publishing target that will be deleted.
- Click Delete # Target(s).
- When prompted, confirm deletion by clicking Yes, Delete.
Publishing
Once you have created a publishing target configuration, you should add that target to your live channel or a live event, set the quality of the stream that will be published, and then publish it.
Key information:
-
A social media or content distribution platform may place restrictions on stream quality. Additionally, the performance of your stream may be affected by a variety of factors (e.g., the social media or content distribution platform's capacity).
Improve performance by publishing a lower quality stream.
-
Publishing a stream via HLS (push/pull) or Zixi (push) supports the insertion of SCTE-35 markers through the SCTE-35 Marker Transmission option. Our service inserts a SCTE-35 marker:
- Live Channel: whenever an ad break occurs.
- Live Event: for key events defined within your live event's marker template.
Each SCTE-35 event's UPID field is set to a live channel or a live event's external ID.
-
Status information is provided for each target associated with your live channel or live event.
Status Description active
Indicates that your live channel or live event is currently being published to that target.
stopped
Indicates that your stream is not being published to the target.
scheduled
Indicates that your stream has been scheduled to be published to this target. This status occurs immediately after you start publishing a target and it should only last for a few seconds.
error
Indicates that your stream could not be published to the target due to an error.
Examples:
- Our service was unable to connect to the social media or content distribution platform using the provided stream URL.
- A social media or content distribution platform's limitation has been exceeded.
-
Encode all content, including slate, at the same resolution.
Encoding content at different resolutions may cause your stream to be published at a sub-optimal resolution or bitrate. Additionally, it may cause large bitrate jumps or drop when switching between content.
 View example.
Let's assume that your stream contains:
- 720p slate
- 1080p content
If your stream started with slate and you published your target with High video quality, then the resolution of your published stream may be capped at 720p.
-
You may add query string parameters to the playback URLs defined within the manifest file for the stream published to your social media or content distribution platform.
Playback URL parameters provide more control over the live stream pushed to your social media or content distribution platform. For example, you may use them to include ad parameters or to add an artificial playback delay.
To publish your content to a platform
-
Create a publishing target. Repeat this step as needed.
-
HLS (Push/Pull)
Start slicing content to the desired live channel or live event.
-
Add a publishing target configuration to your live channel or live event. Repeat this step as needed.
-
Navigate to the Publish tab for the desired live channel or live event.
How? - Click Add Target.
- Select a publishing target created in step 1.
-
Determine the quality of the published stream.
-
HLS (Push/Pull): From the Rays section, mark each rayA stream with a specific quality configuration based on set bit rate and resolution targets. Each ray is divided into slices. that will be published to a social media or content distribution platform. Clear all other rays.
If the Rays section is empty, try slicing content to your live channel or live event.
Your encoding profile determines the set of available rays.
- All Other Targets: Set the quality of the published stream through the Video Quality option. This option is relative to your encoding profile.
-
-
HLS (Push/Pull) or Zixi
Optional. Toggle the SCTE-35 Marker Transmission option to enable the insertion of SCTE-35 markers within the published stream.
-
Optional. From the Output Location option, determine where your stream will be converted to a feed that may be ingested by the social media or content distribution platform identified by the publishing target.
The recommended configuration is Default which allows our system to determine the optimal location according to availability and your publishing target's social media or content distribution platform. You should only set it a specific location under specific circumstances (e.g., locale-specific publishing).
-
YouTube (Integrated Authentication) Only
Perform the following steps:
- From the YouTube Title option, set the video's title.
- From the YouTube Description option, set the video's description.
- From the YouTube Privacy option, set the video's privacy level to either Public, Private, or Unlisted.
-
From the Audience - is this video made for kids? option, choose whether content to be published was "made for kids."
Learn how to determine whether your content is "made for kids."
-
Facebook (Integrated Authentication) Only
Perform the following steps:
- From the Facebook Title option, set the video's title.
- From the Facebook Description option, set the video's description.
-
Optional. Define the set of query string parameters that will be added to the playback URLs defined within the manifest file.
- Verify that the Key-Value Parameters option is enabled.
- Define a query string parameter by setting a key and a value.
- Click Add.
- Repeat steps ii and iii as needed.
Remove a query string parameter by clicking Remove.
- Optional. Click Test to verify that our service may connect to the social media or content distribution platform identified by the publishing target.
- Click Done.
- Click Add.
- Click Publish to start publishing your stream to the desired platform.
-
-
HLS Pull Only
Configure each desired social media or content distribution platform to pull the HLS stream published in the previous step. Perform the following steps to copy a publishing target's HLS URL.
- Once the publishing target is in Active status, click on it to open it.
- Find the HLS Master URL option and then click copy to copy the URL from which you can pull the HLS stream published by our service.
-
Perform one of the following procedures:
-
Facebook or YouTube (Integrated Authentication)
Upon detecting a stream, we will automatically submit a "go live" request for that live stream to Facebook or YouTube.
-
All Other Platforms
From within each social media or content distribution platform, start your live stream.
If you are using a stream key to publish to Facebook or YouTube, you are required to manually start your live stream.
-
To stop publishing
-
Navigate to the Publish tab for the desired live channel or live event.
How? - Click the
 next to the desired publishing target.
 - Repeat the previous step as needed.
To modify publishing stream quality
-
Navigate to the Publish tab for the desired live channel or live event.
How? - Click on the desired publishing target.
- If your content is being published to that target, click Stop Publishing. Once the target's status indicates that it has been stopped, click on the desired publishing target.
- From the Video Quality option, select the quality of the stream to be published.
- If you are ready to start publishing, click Publish. Otherwise, click Done to save your changes.
To remove a publishing target from a live channel or live event
-
Navigate to the Publish tab for the desired live channel or live event.
How? - Mark each desired publishing target.
- Click
 .
.
Publishing Jobs
Adding a publishing target to a live channel or live event creates a publishing job in the stopped state. This publishing job identities:
- A live channel or live event.
- A publishing target.
- The job's current status.
- The timestamp at which the job was last started and stopped.
Key information:
- View all of your publishing jobs from the Jobs tab of the Publishing page. How?
-
Filter your jobs by performing the following steps:
- Click
 .
. - Optional. Click on either Channel or Live Event to filter for all jobs associated with either a live channel or a live event.
- Optional. Mark or clear each status according to whether jobs with that status should be displayed or hidden.
- Click Apply.
- Click
-
Use this consolidated view of your publishing jobs to quickly assess the state of syndication publishing across your entire account.
For example, use this consolidated view to quickly identify what is currently being published from your account by filtering for publishing jobs in the active state.
Publishing Job Event Notifications
Publish key publishing job events through the following workflow:
-
Syndication Publishing pushes data to Amazon SNS for any of the following events:
Severity Event Info
A user starts a publishing job.
Info
A user stops a publishing job.
Warning
Syndication Publishing restarts a publishing job. This typically occurs when the initial attempt to start a publishing job fails.
Warning
Syndication Publishing was unable to communicate with the social media or content distribution platform.
Critical
Syndication Publishing could not start or restart a publishing job. This event only occurs after multiple attempts to start or restart the publishing job have failed.
Critical
Syndication Publishing was forced to stop the publishing job.
- Amazon SNS broadcasts data to one or more destination(s) (e.g., mobile device, web server, or Slack).
Get started with Amazon SNS for free through its SNS free tier.
Learn more.
Syndication Publishing formats data using JSON. This data may then be filtered via custom code. This article explains how to strip out additional data generated by Amazon SNS via a custom function in Amazon Lambda.
Getting Started with Publishing Job Notifications
Perform the following steps to set up Syndication Publishing notifications:
- Set up an Amazon SNS topic.
- Configure communication between Syndication Publishing and Amazon SNS.
-
Configure Amazon SNS to broadcast notifications to the desired destination(s).
Learn how to set up Amazon SNS and Lambda to broadcast notifications to a Slack channel.
Setting up an Amazon SNS Topic
Amazon SNS communicates with publishers and subscribers through a "topic." For this purpose of this article, Syndication Publishing will assume the role of a publisher, while a Slack channel will assume the role of the subscriber.
Amazon SNS may be configured to broadcast data to multiple types of subscribers (e.g., web server, mobile device, email, etc.).
Perform the following steps to create a topic:
- Sign in to the Amazon AWS Management console. If you don't have an AWS account, then sign up for one.
- Open the Amazon SNS console.
-
Click Get started.
Amazon SNS may require Amazon SES (i.e., Amazon Simple Email Service). Please sign up for the Amazon SES service if an error message appears within the SNS dashboard.
-
From the upper-right hand corner, change your location to:
US West (Oregon) us-west-2 - Click Topics from the side navigation pane.
- Click Create topic.
-
Click Standard.
Our service does not support pushing notifications to a First-In-First-Out (FIFO) topic.
- In the Name option, assign a unique name (e.g.,
- Optional. If notifications will be sent over SMS notifications, then set the Display name option to the desired name.
- Expand the Access policy section.
-
From the Define who can publish messages to the topic option, select Only the specified AWS accounts.
Set the Only these AWS users option to our AWS account ID:
545191325524 - Click Create topic.
- Copy the topic's ARN.
Configuring Communication with Amazon SNS
Syndication Publishing requires an ARN topic before it will push data to Amazon SNS. Perform the following steps:
-
Navigate to the SNS tab of the Syndication Publishing page.
How? - In the SNS Topic ARN setting, paste the ARN for the topic created above.
- Click Save.
Integrating Slack with Amazon SNS
Amazon SNS can broadcast notifications to different subscribers (e.g., mobile devices) using a variety of delivery methods (e.g., HTTP, email, AWS Lambda, etc.).
The configuration that has been performed up to this point allows the Syndication Publishing to send notifications to Amazon SNS. This section explains how to push those notifications from Amazon SNS to a Slack channel. Integrating Amazon SNS involves the following steps:
- Set up a Slack webhook.
- Create an Amazon Lambda function that subscribes to the Amazon SNS topic.
Setting up a Slack Webhook
Slack requires that a webhook be created before it will post messages from external sources (e.g., Amazon SNS).
Learn how to create a Slack webhook.
Subscribing to a SNS Topic via Amazon Lambda
Amazon SNS needs to be informed of the above webhook before it can send data to a Slack channel. This task may be performed via Amazon Lambda. Amazon Lambda is a compute service that runs code in response to events (e.g., when data is pushed from a Syndication Publishing to Amazon SNS).
View Amazon Lambda's documentation.
This article creates a Lambda function in Python that performs the following tasks:
- Subscribes to a SNS topic.
- Identifies the Slack webhook through which it will post messages to a Slack channel.
- Strips out data added by Amazon SNS.
Add custom code to this function to tailor how messages are posted to a Slack channel (e.g., filter notifications by Syndication Publishing).
Perform the following steps to create a Lambda function:
- Open the Amazon Lambda console.
- Click Get Started Now.
- Click Blank Function.
-
Click the dashed box and then select "SNS" as the trigger for this function.
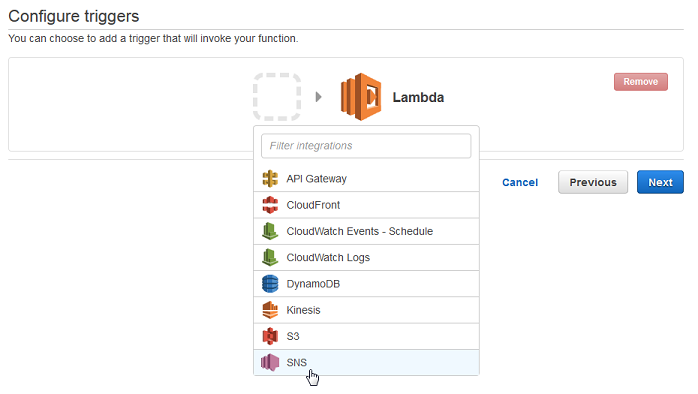
- Verify that the SNS topic created earlier in this article is selected in the SNS topic option.
- Mark the Enable trigger option.
- Click Next.
-
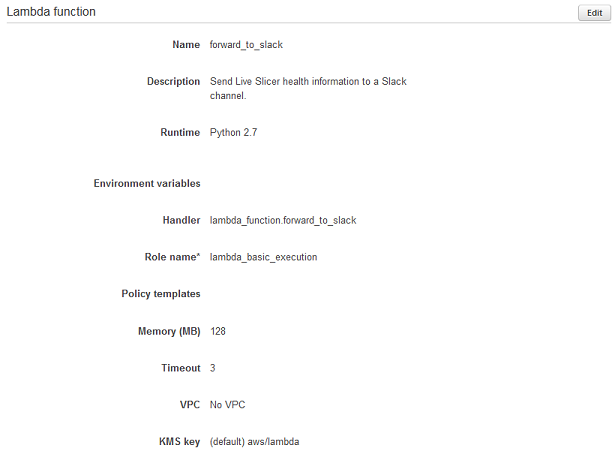
Configure the Lambda function as follows:
- Name: Set the Name option to the name of the function (e.g., forward_to_slack).
- Description: Set the Description option to a brief description for the purpose of the function (e.g., Send Syndication Publishing information to a Slack channel.).
- Runtime: Set the Runtime option to "Python 2.7."
-
Code: Set the Lambda function code option to the following code:
import json
import urllib2

def forward_to_slack (event, context):
    # The URL for your Slack Channel's webhook
    url = "https://hooks.slack.com/services/ABCDE1234/FGHIJ5678/KLMNOPQRSTUV901234567890"

    # Format the message
    try:
        # Try to navigate to the Message that was sent via SNS and strip out the
        #  rest of the delivery information
        slack_data = {"text":str(event['Records'][0]['Sns']['Message'])}
    except:
        slack_data = {"text":str(event)}

    # Dump the json to prepare it for sending
    data = json.dumps(slack_data)

    # Create the request
    req = urllib2.Request(url, data)

    # Send request
    urllib2.urlopen(req)
Update the webhook URL defined in the code to point to the one copied in the Setting up a Slack Webhook section.
-
Handler: Set the Handler option to "lambda_function." and then append the name of the function defined in the Name option (e.g., lambda_function.forward_to_slack).
-
Role: Set the Role option to "Create new role from template(s)."
-
Role name: Set the Role name option to the name that will be assigned to the new role (e.g., lambda_basic_execution).
-
Click Next.
-
Amazon Lambda will now allow you to review the function that will be created. Verify that the correct SNS topic has been selected and that the Lambda function configuration looks similar to the following illustration:
-
Click Create function.
Amazon Lambda will now automatically post data to a Slack channel as it is provided by Syndication Publishing.
Key Publishing Job Notification Fields
Syndication Publishing sends information that describes a key publishing job event in JSON format. Key parameters in this notification are described below.
| Field | Description |
|---|---|
|
Subject |
Provides a simple description of the publishing job event that triggered this notification. Syntax: Syndication Notification - SeverityIndicates whether it is an Info, Critical, or Warning notification. - EventDescribes the type of notification. - TimestampIndicates when the notification was triggered.
Example: "Syndication Notification - Info - Job started by user - 2021-12-10_21:15:55",
|
|
Message |
Provides detailed information about the publishing job event. Key parameters are described below.
Example: "{\"Service\": \"syndication\", \"Sender\": \"syndication\", \"Date_Time\": \"2021-12-10_21:15:55\", \"Severity\": \"Info\", \"Message\": \"Job started by user\", \"Description\": \"\", \"Schedule_Id\": \"23f1ed53db5e4538b6a0b31183fad807\", \"Target_Name\": \"YouTubePT\", \"Protocol\": \"rtmp\", \"Platform\": \"YouTube\", \"Content_Name\": \"Entertainment\", \"Content_Id\": \"c8929b67f1354607877b319edb0c01af\", \"Content_Type\": \"c\"}"
|