This article explains how to set up customer origins. If your account has been updated to use customer origin groups, please refer to the External Servers (Customer Origin Group) article for setup information.
From the main menu, navigate to
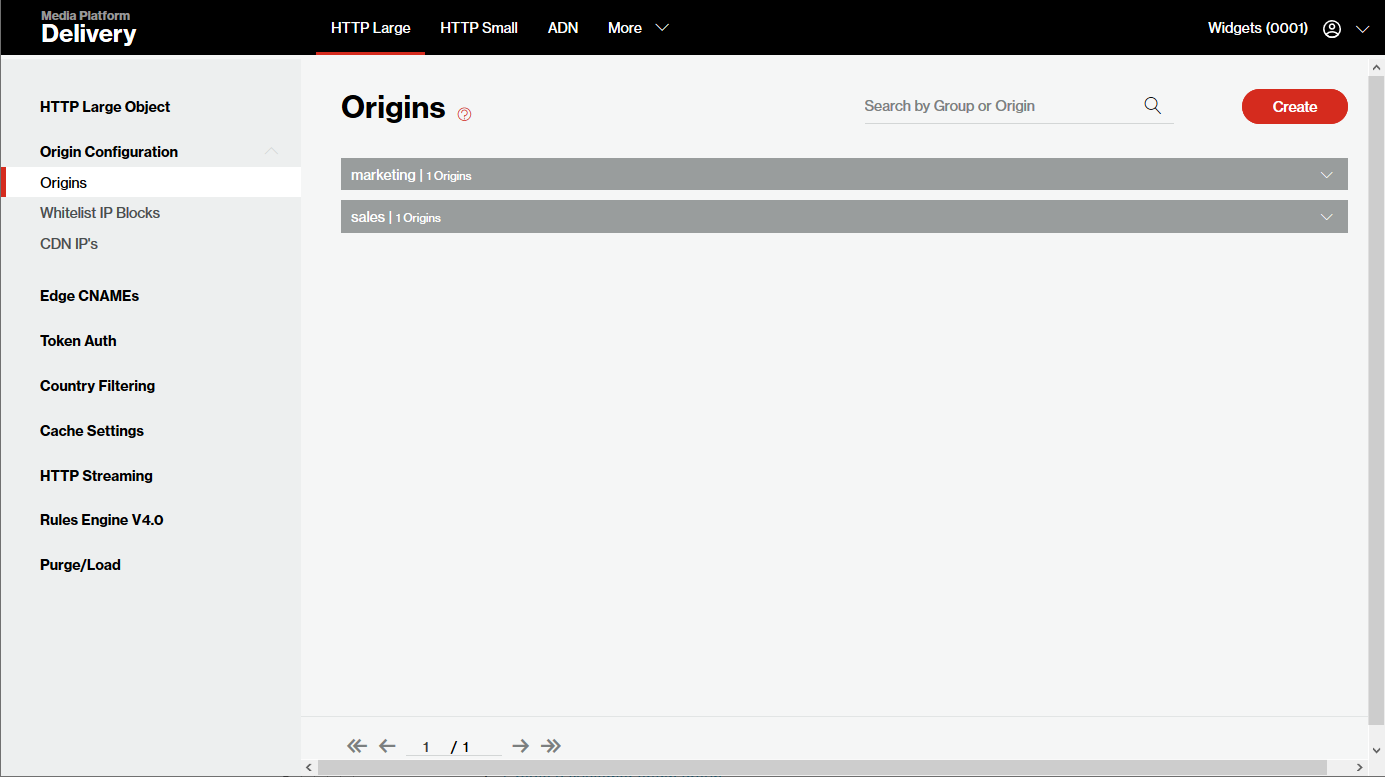
If your account supports customer origin groups, it should look similar to the following illustration:
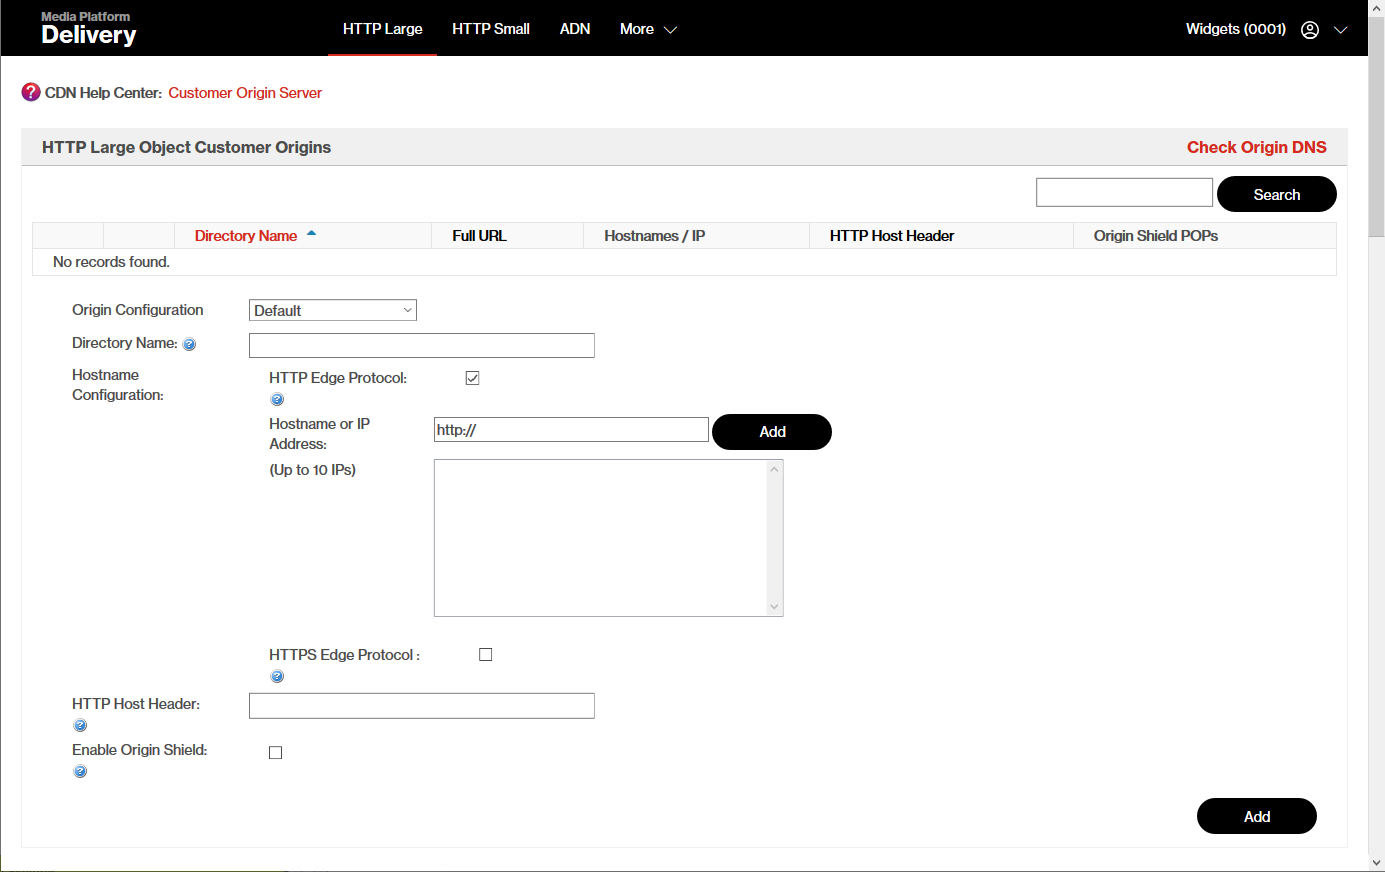
If it still uses the legacy method for customer origin configuration and therefore doesn't support customer origin groups, it will look like the following illustration:
Customer origin groups allow you to leverage our built-in support for connecting to new or preexisting Azure block blob containers. Contact your CDN account manager to upgrade your account to support customer origin groups.
Serve content stored or generated by third-party web servers (e.g., web hosting) via the CDN by:
- Creating a customer origin configuration. This type of configuration maps one or more servers to a CDN URL.
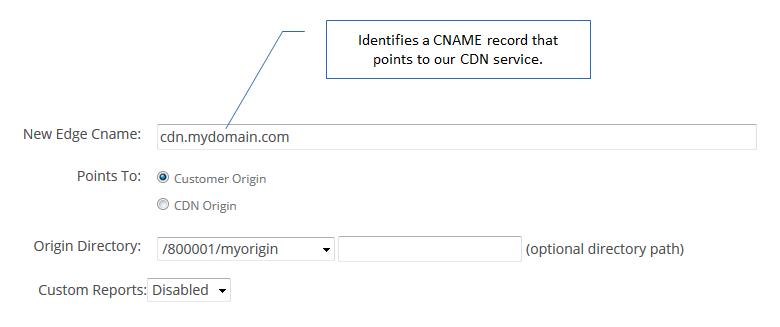
- Optional. Creating an edge CNAME configuration that allows you to serve traffic via the CDN without having to update your links. This type of configuration maps a customer origin configuration to a CNAME record.
Key information:
- The maximum number of customer origin configurations
- Each customer origin configuration is specific to a platform.
- A directory name must be specified when defining a customer origin configuration. A URL segment in a CDN URL leverages this name to identify the data source (i.e., your web servers) for the requested content.
-
CDN URLs are case-sensitive.
 View sample scenario.
This scenario assumes that you have created a customer origin whose directory name is Marketing.
The following CDN URL uses the proper case:
https://wpc.0001.edgecastcdn.net/800001/Marketing/index.htmlThe following CDN URL uses the incorrect case for the name of the customer origin (i.e., Marketing) and therefore is invalid:
https://wpc.0001.edgecastcdn.net/800001/marketing/index.html -
Define the set of servers that will fulfill HTTPUse the HTTP Edge Protocol option to define how HTTP requests are handled./HTTPSUse the HTTPS Edge Protocol option to define how HTTPS requests are handled. requests.
Set up a TLS certificate via our Certificate Provisioning System. If your account has not been upgraded to use our Certificate Provisioning system, then you must contact your CDN account manager to set up a TLS certificate.
Learn more. -
Please ensure that your firewall is configured to allow requests from our network. Additionally, requests that originate from our network should not be rate limited.
-
It is strongly recommended to cloak your origin to protect it against attacks that directly target your web servers and thereby bypass the security provided by our CDN service.
-
A list of customer origin configurations are provided on the
Clear a search by searching for a blank value.
View a sample search scenario.
Searching for "cdn" would include all of the following results:
- cdn
- mycdn
- cdn2
It would exclude all of the following results:
- CDN
- myCdn
IP Version
Hostnames associated with a customer origin configuration must be resolved to an IP address before a request can be served to it. The Origin Configuration option determines whether our servers will prefer to resolve a hostname to an IPv4 or IPv6 address.
| Setting | Description |
|---|---|
|
Default |
Indicates that hostnames should be resolved to IPv4 addresses only. We reserve the right to change the behavior of this default setting at any time. |
|
V6 Preferred Over V4 |
Indicates that our edge servers will resolve hostnames to IPv6 addresses whenever possible. If an IPv6 address for that hostname does not exist, then the hostname will be resolved to an IPv4 address. |
|
V4 Preferred Over V6 |
Indicates that our edge servers will resolve hostnames to IPv4 addresses whenever possible. If an IPv4 address for that hostname does not exist, then the hostname will be resolved to an IPv6 address. |
|
V4 Only |
Indicates that hostnames should be resolved to IPv4 addresses only. |
|
V6 Only |
Indicates that hostnames should be resolved to IPv6 addresses only. |
Directory Name
The Directory Name option uniquely identifies your customer origin configuration. This name is included as a URL segment within a CDN URLA system-defined URL that points to a CDN hostname. A CDN URL allows content delivery via our network. Simplify your CDN setup by also creating an edge CNAME configuration which potentially allows you to deliver traffic via the CDN using the same links as your current setup. as indicated below.
Set up a friendlier and shorter URL (i.e., edge CNAME URLThis type of URL takes advantage of an edge CNAME configuration and a CNAME record to provide a friendlier alternative to a CDN URL. An edge CNAME URL is specific to the platform from which it was configured.) by creating an edge CNAME configuration and defining a CNAME record.
Learn more.
CDN and edge CNAME URLs are case-sensitive.
Sample Directory Name
If the primary purpose of your web servers is to serve images, then you might create a customer origin configuration whose Directory Name option is set to "images." An example of what a CDN URL for this type of customer origin might look like is provided below.
Sample CDN URL:
http://wpc.ANThis term represents your customer account number (e.g., 0001) which can be found in the upper right-hand corner of the MCC..edgecastcdn.net/80ANThis term represents your customer account number (e.g., 0001) which can be found in the upper right-hand corner of the MCC./imagesIdentifies a customer origin configuration by its directory name.
The above sample CDN URL points to the root folder on the server(s) associated with the "images" customer origin configuration. Append the desired relative path to the content that you would like to request. For example, the following sample CDN URL points to this location "http://www.myserver.com/photography/clientX/" on your web servers:
Hostname and IP Address Configuration
A customer origin configuration must point to one or more web servers. These web servers are defined through the Hostname Configuration section (shown below).
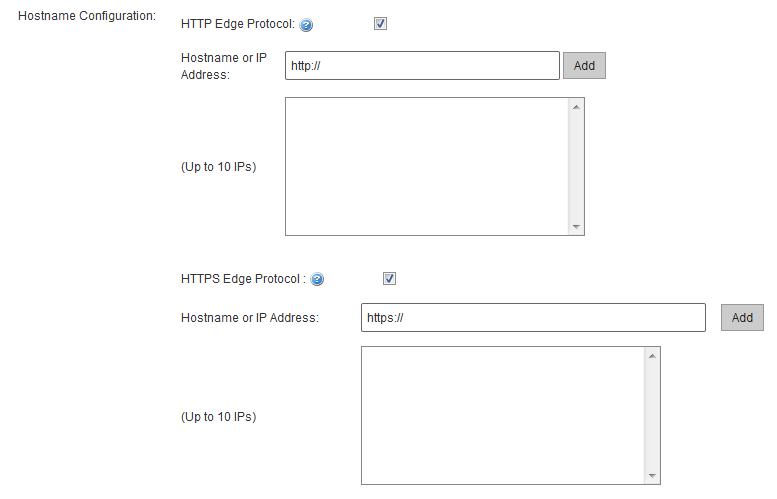
A customer origin's web servers are defined through the following two options:
| Option | Description |
|---|---|
|
HTTP Edge Protocol |
Defines the set of servers that can fulfill HTTP requests. |
|
HTTPS Edge Protocol |
Defines the set of servers that can fulfill HTTPS requests. This capability requires the following items:
The above setup allow the use of a HTTP Secure (HTTPS) URL when delivering content over our network. |
Key information:
-
Use the following syntax to define each desired web server:
Syntax Example protocolReplace this term with either "http" or "https." The defined protocol will be used for edge server to origin server communication.://hostname:port Defining a port through which communication will be established is optional. If omitted, a default port (i.e., 80 or 443) will be assigned to your hostname/IP address.
http://www.mydomain.com:80
protocol://IPAddress:port
http://10.10.10.255:80
http://[ 1:2:3:4:5:6:7:8]:80
The set of hostnames and IP addresses defined for either the HTTP Edge Protocol or the HTTPS Edge Protocol list must be assigned the same protocol (i.e., HTTP or HTTPS).
- You may not specify a hostname or IP address that points to our network. This type of configuration is disallowed since it may cause your traffic to infinitely loop within our network.
-
An optimal configuration requires that the web servers specified for each customer origin reside in relatively close vicinity to one another.
The recommended setup for optimal performance for web servers located in disparate geographic regions is to create a customer origin configuration for each region.
-
In order to avoid DNS latency when loading content from a customer origin server, our edge servers proactively resolve each hostname defined in a customer origin configuration.
Our edge servers respect the DNS TTLDefines the length of time, in seconds, that a DNS record will be cached by a recursive nameserver. for the DNS record corresponding to each hostname.
If our edge servers are unable to resolve a hostname or if the hostname's DNS TTL has expired, then they will reattempt to resolve it at regular intervals until it is resolved. Since this action may incur additional charges by your DNS provider, it is recommended that all hostnames associated with a customer origin configuration be registered in DNS with a reasonable TTL (e.g., 3600 seconds or more).
- Any combination of hostnames and IP addresses may be used to identify the set of origin servers that can honor requests for the customer origin being configured.
- Defining more than one server for either the HTTP Edge Protocol or the HTTPS Edge Protocol list will cause requests to be load balanced across those origin servers for that protocol.
- A maximum of 10 hostnames and/or IP addresses per protocol (i.e., HTTP or HTTPS) can be associated with a customer origin configuration.
- Learn more about our IPv6 support.
A hostname must be resolved to an IP address before a request can be forwarded to it. The Origin Configuration option defines how hostnames will be resolved to an IP address.
Learn more.
HTTP Requests
The HTTP Edge Protocol option defines the set of web servers that can handle HTTP requests.
Key information:
- Make sure that all web servers defined for the HTTP Edge Protocol option use the same protocol (i.e., either HTTP or HTTPS).
- If a valid origin server has not been specified under the HTTP Edge Protocol option, a 404 Not Found error message will be returned to the user when content is requested from your origin server using the HTTP protocol.
HTTPS Requests
The SSL Traffic feature enables an additional customer origin configuration option called "HTTPS Edge Protocol." This option functions in the same way as the HTTP Edge Protocol option, except that it determines how HTTPS requests are handled.
Learn how to implement an HTTPS solution.
Key information:
- The HTTP protocol may be used to fulfill HTTPS requests, but this type of configuration would sacrifice end-to-end encryption of the request and response. If this describes your preferred configuration, please make sure that all servers are identified using the HTTP protocol.
- If a valid hostname has not been specified under the HTTPS Edge Protocol option, a 404 Not Found error message will be returned to the user when content is requested from your origin server using the HTTPS protocol.
- Base CDN and edge CNAME URLs for HTTPS requests are listed within the SSL URL section on the
HTTP Host Header
HTTP 1.1 requires a Host header to be sent with each request. A Host header identifies the hostname/IP address and port associated with a request. This information is especially useful when there are multiple virtual domains hosted on a single physical server or load-balanced set of servers.
Each customer origin configuration allows a Host header value to be configured. Typically, the Host header value should be set to either of the following:
- A hostname or IP address associated with the customer origin configuration being updated.
-
A hostname corresponding to a CNAME record that meets the following requirements:
- It points to our CDN service.
-
It has been associated with an edge CNAME configuration that points to the customer origin configuration whose Host header is being defined.
Key information:
- By default, the HTTP Host Header option is set to the first hostname or IP address defined under the Hostname Configuration section.
- If the HTTP Host Header option is set to blank, then the request URI determines the value for the Host request header.
Load Balancing
A load balancing configuration defines how traffic will be managed between the edge of our network and a customer origin for a particular protocol (i.e., HTTP or HTTPS).
- HTTP Traffic: The hostnames/IP addresses associated with the HTTP Edge Protocol option are resolved into a list of IP addresses through DNS.
- HTTPS Traffic: A separate list of IP addresses is generated for the HTTPS Edge Protocol option.
Traffic may only be served over the protocols that have been enabled on a customer origin. If the HTTPS Edge Protocol option is unavailable, then the SSL Traffic feature has not been enabled on the current platform. Please contact your CDN account manager for more information.
If multiple unique IP addresses are associated with either option, then the selected load balancing mode determines which IP address will handle the next request.
The available load balancing options are:
- Round Robin: This mode distributes requests evenly across all IP addresses generated for a particular protocol (i.e., HTTP or HTTPS). If a server is unavailable, then the request will be sent to the next IP address on the list. View additional details.
- The first request is forwarded to the first IP address on the list.
- The next request is forwarded to the IP address listed directly below it. This step is repeated until a request is forwarded to the last IP address on the list.
- Last Server: If a request is forwarded to the last IP address on the list, then the next request is forwarded to the first IP address on the list.
- Primary & Failover: This mode indicates that the specified IP addresses form an ordered failover list. The order of the failover sequence can be controlled by rearranging entries through the up/down double arrow buttons.View additional details.
- All requests will be forwarded to the first IP address on the list.
- If the current server is unavailable, then the request will be sent to the next IP address on the list. This step is repeated until a server is able to honor the request.
The above load-balancing options are completely independent from any load balancing configuration that may already distribute traffic to your web servers. For instance, traffic for a single IP address might be balanced across several physical servers.
Unavailable Servers
A server is considered unavailable when either of the following conditions are true:
- A TCP connection is refused.
- The connection times out.
The manner in which an unavailable server affects load balancing is described below.
- Once a server is designated as unavailable, CDN traffic will not be load balanced to the corresponding hostname or IP address for a brief time period.
- Upon the expiration of this time period, CDN traffic may once again flow through the corresponding hostname or IP address according to the customer origin's load balancing configuration (i.e., Round Robin or Primary & Failover).
- If the server is still unavailable, then CDN traffic will not be load balanced to the corresponding hostname or IP address for a brief, but slightly longer time period.
- Steps 2 and 3 repeat until the server becomes available.
Origin Shield
Origin Shield establishes an additional buffer between a customer origin server and your clients. This buffer is useful for protecting a customer origin server from:
- Denial of service attacks
- Spikes in traffic
The Origin Shield feature is only available after it has been activated on the HTTP Large and/or the HTTP Small platform. This feature is unavailable for all other platforms. For more information, please contact your CDN account manager.
How Does It Work?
The Origin Shield feature reduces the number of requests that are sent to the customer origin server. This results in reduced server and network load on the customer origin server. It is able to accomplish this by establishing an intermediate caching layer between the customer origin server and an edge server. This intermediate caching layer is illustrated below.
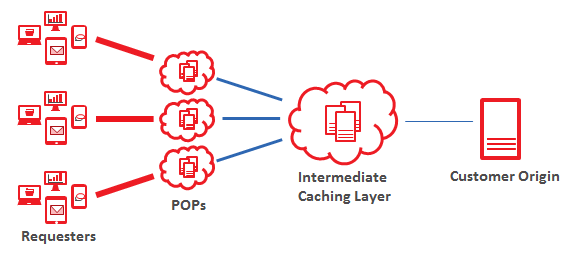
This intermediate caching layer augments the default CDN caching behavior in the following ways:
- Content requested from a customer origin server may now be cached on our origin shield servers (i.e., intermediate caching layer).
-
If an edge server does not have a freshIdentifies cached content that can be served directly by an edge server without requiring revalidation with an origin server. It also indicates that the cached content's TTL has not expired. version of the requested content, then it will forward the request to an origin shield server.
The origin shield server will handle this request according to the cache state of the requested content (as indicated below).
Cache State Description Fresh
State:
An Origin Shield server contains a freshIdentifies cached content that can be served directly by an edge server without requiring revalidation with an origin server. It also indicates that the cached content's TTL has not expired. version of the requested content.
Action:
The asset is served directly from an Origin Shield server.
Benefit:
In this scenario, Origin Shield provides the response instead of a customer origin server. This eliminates bandwidth and load on your network.
Stale
State:
An Origin Shield server contains a staleIdentifies cached content whose TTL has expired. Our edge servers revalidate stale content with the origin server. This step ensures that the latest version of the requested content is served to the requester. version of the requested content.
Action:
An Origin Shield server will revalidateRefers to the process that occurs when a request for stale content requires that our edge servers check for a new version of the requested content on the origin server. the cached asset with the origin server.
Benefit:
Origin Shield provides a central caching repository that increases the probability that the requested content has been previously cached. In turn, this drastically reduces the number of revalidation requests that are sent to the customer origin.
Not Found (Miss)
State:
An Origin Shield server does not contain a cached version of the requested content.
Action:
An Origin Shield server will forward the request to the customer origin server.
Benefit:
Origin Shield provides a central caching repository through which the frequency of requests for the same content may be minimized. Requests forwarded by Origin Shield to a customer origin may result in cached content. Origin Shield may then serve that cached content for subsequent requests.
Origin Shield Configuration
Protecting a customer origin through the use of the Origin Shield feature requires the selection of a single (recommended) or multiple origin shield locations. Each configuration method is described below.
Each origin shield server is identified by the city and the three-letter abbreviation for the POP where it is located. The use of a POP abbreviation allows you to distinguish between multiple origin shield servers in the same city.
Single Origin Shield Location (Recommended)
The recommended configuration for reducing requests to your customer origin server is to define a single origin shield location. This can be achieved by selecting the Single POP option and then selecting the location closest to the server(s) associated with the customer origin.
The workflow through which a request for content protected by Origin Shield is handled by our CDN service is illustrated below.
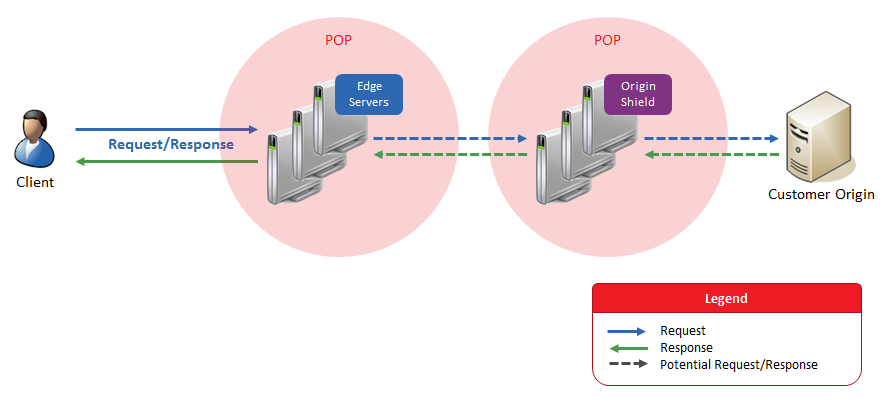
The above workflow is described below.
-
If an edge server does not have a cached version of the requested content, then it will forward the request to the specified origin shield location.
If a cached version is found, the requested content will be served immediately to the client.
-
If an origin shield server does not have the requested asset, it will forward the request to your web servers.
If a cached version is found, then the origin shield server will serve it immediately to the client via the edge server from the previous step. Proceed to step 5.
- Once the origin shield server receives the requested content from your web servers, it will forward it to the edge server that requested it. After which, it may cache the requested content.
- The edge server will deliver the content to the client that requested it.
- The edge server may then cache it.
Multiple Origin Shield Locations
An alternative configuration is to define several origin shield locations for a single customer origin configuration. This can be accomplished by selecting the Multiple POPs option and then choosing how requests are handled for each of the following regions: North America: West Coast United States, North America: East Coast United States, Europe, and Asia/South America. Choose one of the following options for each region:
- Blank: Leaving a region blank indicates that requests for this region will skip the origin shield server in the selected POP and attempt to retrieve it from the next closest origin shield server.
- POP: Selecting a POP activates origin shield for that region. Requests for this region will go through the selected origin shield. If the origin shield does not have the requested asset, it will request it from the customer origin server.
- Bypass: Selecting to bypass a region indicates that requests for this region will bypass the origin shield and go directly to the customer origin server. This type of configuration is the equivalent of turning origin shield off for a particular region.
Origin shield locations in Asia and South America require the activation of the Premium Asia and Latin America geographic delivery regions, respectively.
ADN Gateway
ADN Gateway servers are responsible for ensuring efficient data delivery between the CDN and external web servers (i.e., customer origin servers). Before anADN Gateway server can assume this responsibility, our network will need to calculate the top three ADN Gateway servers that can provide the best performance for a customer origin configuration. This is calculated by requesting an asset from each web server associated with a customer origin configuration.
Configuration:
- File Size: The ideal type of asset to test the latency between ADN Gateway servers and your customer origin server(s) is one whose size is approximately 5 – 10 KB.
- Upload: Upload an asset to each server associated with the customer origin configuration.
Sample Asset: Download a sample performance test asset.
This sample performance test asset may also be downloaded from the Customer Origin page by hovering the cursor over the
 icon that appears next to the Validation Path option. Follow the "Download Sample Asset" link at the bottom of the tooltip.
- Multiple Servers: Make sure to upload the desired asset to the same location on all servers associated with the desired customer origin configuration.
-
Set the Validation Path option to a URL that points to the desired asset.
If a Host header value has been defined in the HTTP Host Header option, then it is recommended that the hostname defined in the validation path match that header value.
Example:
http://cdn.mydomain.com/_images/PerformanceTestObject_5k.gif -
Click Validate to check the communication with each specified server and to verify that the asset is available on each of those servers.
- Error: If an error is reported, make sure to address the error and then reattempt the validation.
-
200 OK: If the test returns 200 OK for all specified hostnames/IP addresses, click Add or Update.
This will cause the following actions to take place:
- The customer origin configuration will be created or updated.
- The latency between our ADN Gateway servers and each server specified within the customer origin configuration will be tested by requesting the specified asset. The top three ADN Gateway servers, in terms of performance, will then be assigned to the customer origin.
Key information:
- If the asset defined in the Validation Path option needs to be moved, renamed, or deleted, make sure to perform the same action on all servers specified in your customer origin configuration and then update the Validation Path option to reflect this change.
-
If a sub-optimal configuration is detected, then a message will appear directly below the ADN Gateways section. It is highly recommended that you verify that the detected issue will not affect your website's performance.
Example
If ADN detects that your site is redirecting URLs to another server, then this could lead to a situation where the wrong ADN Gateway server is being used to accelerate your website.
- Use the Follow redirects option to determine whether our edge servers will respect a URL redirect when validating the set of optimal ADN gateway servers for a customer origin configuration.
- Creating a customer origin will automatically revalidate the optimal path between the customer origin and ADN Gateway servers.
-
The use of the Reselect option is recommended under the following circumstances:
- A customer origin is modified.
- An ADN Gateway error is reported. Please resolve the error before reselecting the set of ADN Gateway servers that will be associated with the customer origin.
- A new ADN Gateway configuration may take up to an hour to take effect. During this time period, the ADN Gateway servers previously assigned to a customer origin configuration will continue to accelerate your site.
Sample Validation Path
The following sample scenario provides an example as to how the Validation Path option should be configured.
| Item | Scenario Description |
|---|---|
|
HTTP Host Header |
A customer origin server's HTTP Host header is set to: adn.mydomain.com
|
|
Sample Asset Configuration |
A sample asset has been uploaded to all of the servers defined under the Hostname Configuration section. The relative path to this sample asset is: /Permanent/Background.png
|
|
Validation Path |
The Validation Path option should be set to: http://adn.mydomain.com/permanent/background.png
|
Key Response Headers
Configure your web server(s) or Rules Engine to include key headers in the response sent to the client to ensure optimal CDN performance.
Cache Revalidation
The web server(s) associated with a customer origin should include one of the following headers with each response that should be cached:
- Last-Modified (recommended)
- ETag
The above response headers allow our edge servers to perform cache revalidationRefers to the process that occurs when a request for stale content requires that our edge servers check for a new version of the requested content on the origin server. when staleIdentifies cached content whose TTL has expired. Our edge servers revalidate stale content with the origin server. This step ensures that the latest version of the requested content is served to the requester. content is requested. If both response headers are missing, then our edge servers will perform an unconditional GET request to the customer origin server.
QUIC
Allow QUIC-compatible clients to leverage QUIC by including the alt-svc header in the response.
The easiest way to enable QUIC for all CDN traffic is to add the QUIC feature under the Always match condition.
Setting Response Headers
Response headers may be defined via either of the following methods:
- Define them within your web server's configuration.
-
Rules Engine: Create a rule that:
- Identifies the type of requests to which response header(s) will be added.
- Defines each response header that will be added to the response. Add a Modify Client Response Header feature for each desired response header.
Google QUIC
QUIC is an emerging technology that is developing at a rapid pace. For this reason, we are occasionally required to temporarily suspend this capability when upgrading our QUIC implementation. Although QUIC will be disabled during these maintenance windows, your traffic will continue to be accelerated via our network.
Google QUIC, which stands for Quick UDP Internet Connections, is a new transport protocol developed by Google that reduces latency and provides better HTTP/2 stream-multiplexing support when compared to TCP. QUIC provides functionality equivalent to TCP + TLS + HTTP/2 except that it is implemented over UDP.
QUIC is only supported for client-to-edge traffic to customer origins that have been configured to support TLS.
Learn more.
According to The Chromium Projects, it provides the following advantages over TCP + TLS + HTTP/2:
- Dramatically reduced connection establishment time
- Improved congestion control
- Multiplexing without head of line blocking
- Forward error correction
- Connection migration
QUIC Setup
Enable QUIC by setting up a rule within Rules Engine that either:
- Enables the QUIC Rules Engine feature for all traffic or the desired edge CNAMEs. This is the recommended method.
-
Adds the alt-svc response header for all traffic or the desired edge CNAMEs.
If you are manually adding the alt-svc response header, it is strongly recommended to use both QUIC Versions HTTP variables to define the v parameter. Explicitly defining the set of supported versions is strongly discouraged since you will need to manually update it whenever we add or drop support for a specific version.
Once a QUIC-compatible user agent discovers that a server supports QUIC, it will attempt to leverage QUIC for all subsequent requests to the same domain until the connection ends. This means that enabling QUIC using more granular control will not accomplish the desired result.
Sample Scenario
In this sample scenario, you have created a rule that only enables QUIC for HTML files.
Let's assume that a QUIC-compatible user agent requests the following file:
This user agent will leverage QUIC for all subsequent requests to cdn.example.com until the connection ends. This will occur regardless of whether HTML files are being requested.
To enable QUIC via Rules Engine
Before enabling QUIC, please verify that the desired customer origin(s)
- Create a draft.
-
Update a rule within that draft to define the condition(s) under which QUIC should be enabled.
- All Traffic: If QUIC should be enabled for all traffic, then add the Always match condition.
-
Edge CNAME: If QUIC should only be enabled for specific edge CNAMEs, then add one or more Edge CNAME match condition(s).
Use a Select First Match section to add more than one Edge CNAME match condition to a single rule.
- Add the QUIC feature directly below the match condition(s) created in the previous step. Set it to Yes.
- Click Save to save the rule.
- Click Lock Draft as Policy to convert the draft into a policy.
- Deploy the policy to the Production or Staging environment.
How Does QUIC Work?
Before a user agentRefers to software that acts on behalf of a user. For example, a web browser (e.g., FireFox, Chrome, and Internet Explorer) is a user agent. A web browser will make HTTP/HTTPS requests based on user actions (e.g., requesting a web site or clicking a link). may leverage QUIC, it must be informed via the alt-svc (Alternative Service) response header that it may communicate with the CDN via QUIC. This response header also informs the client the set of supported QUIC versions and the length of time that this data should be cached by the client.
By default, QUIC is supported on the latest versions of Google Chrome, Chromium, and Opera. However, it may require enablement. If a user agent doesn't support QUIC, then it will communicate with the CDN using HTTP/2 over TCP.
Our QUIC implementation supports the Bottleneck Bandwidth and Round-trip propagation time (BBR) congestion control algorithm without requiring additional CDN setup. However, BBR will only be used when a QUIC-enabled client (e.g., Google Chrome) requests it.
Sample alt-svc header name/value:
The above sample response header indicates to the client that:
- QUIC is only supported for traffic over port 443 as defined by the quic parameter.
- The user agent should treat the connection as fresh for 259,200 seconds (i.e., 3 days) as determined by the ma (max-age) parameter.
-
Our CDN only supports QUIC versions defined within the v (version) parameter.
We may add or drop support for QUIC versions at any time. Ensure that your configuration remains up-to-date through the QUIC feature.
WebSocket Protocol
The WebSocket protocol is a TCP-based protocol that enables an open, continuous, and full-duplex connection between a client (e.g., web browser) and a server. This allows a server to send data to a client without requiring the client to request it. In contrast, the HTTP protocol only allows a server to respond when a client requests content.
Leverage the WebSocket protocol for low latency applications that require real-time, interactive communication. For example, WebSocket communication improves the user experience for multiplayer games and chat applications by providing higher responsiveness via lower latency.
Key benefits:
- Full-Duplex Communication: The WebSocket protocol offers bidirectional communication between the server and the client. This allows both parties to communicate and exchange data at the same time.
- Eliminates Unnecessary Requests: A persistent connection between the client and the server means that the client does not need to constantly check for new data. Your server may now push the data to the client.
- Lower Latency: A persistent connection also reduces latency by eliminating the normal overhead required by HTTP (e.g., headers).
WebSocket Setup
Set up involves:
-
WebSocket Protocol Activation
You must activate support for the WebSocket protocol before you can leverage it.
Contact your CDN account manager to request support for the WebSocket protocol. We will determine whether to activate it based on an analysis of your use case.
-
Web Server Setup
Verify that your web server supports the use of the WebSocket protocol. After which, you should implement a WebSocket server-side application and verify that it allows bidirectional communication with your client.
Our network acts as a middleman between your client and server for bidirectional communication via the WebSocket protocol. If your web server does not properly support WebSocket communication, then a client's request to upgrade to the WebSocket protocol will fail and communication will proceed via HTTP.
-
Client Setup
- Verify that the client natively supports the WebSocket protocol. Most modern browsers already support the WebSocket protocol. If your custom application does not already support it, then you will need to add support for it before proceeding to the next step.
-
Update your client to include the following request headers when initially requesting a connection that requires low latency:
Connection: Upgrade
Upgrade: websocket
These headers indicate that the client wants to change the protocol from HTTP to WebSocket.
-
Update your client to re-initiate the connection with the server upon disconnection.
A client, server, or a network disruption may disconnect a WebSocket connection.
How Does the WebSocket Protocol Work?
A WebSocket connection starts when a client submits a request to the CDN over HTTP. This request must inform an edge serverThis type of server is located near the edge of our network where its close proximity to your end-users allows it to deliver data more quickly than normal Internet communication. It is responsible for handling requests and caching assets. that the client would like to upgrade the connection to use the WebSocket protocol via the following request headers:
Connection: Upgrade
Upgrade: websocket
If the WebSocket protocol has been activated on your account, an edge server will forward the request to your web server(s). Your web server must then either:
-
Accept the request to upgrade to the WebSocket protocol with a 101 Switching Protocols response that contains the following response headers:
Connection: Upgrade
Upgrade: websocket
An edge server will forward the response to your client. Once the client receives this response, the handshake will be complete and a WebSocket connection has been established. This connection allows both the client and the server to send control (i.e., Close, Ping, and Pong) and data frames to each other. This connection will persist until either the client or the server closes it.
For the purpose of log data, all client/server communication within a single WebSocket connection is treated as a single log entry. Additionally, it is not logged until either the client or the server closes the connection.
- Deny the protocol upgrade request with a 4xx response. An edge server will forward this 4xx response to the client.
Firewall Access
For the purpose of fulfilling requests, our edge servers require access to all servers associated with a customer origin configuration. Please ensure that your firewall allows access to all of the IP blocks listed in the Whitelist IP Blocks section of the Customer Origin page.
Export a list of the IPv4 and IPv6 blocks that should be whitelisted by clicking ![]() from the Whitelist IP Blocks header.
from the Whitelist IP Blocks header.
The Whitelist IP Blocks section contains a superset of IP addresses that includes:
- The IP blocks defined under the The following CDN IPs can access your origin section.
- The IP blocks for future POPs.
Once the IP blocks defined under the Whitelist IP Blocks section have been whitelisted on your firewall, it is unnecessary to add the IP blocks defined under the The following CDN IPs can access your origin section.
Best Practices (Dynamic Application)
If your customer origin hosts a dynamic application, then it is highly recommended that you do not use a user's IP address to maintain a session instance. This type of configuration is unsupported, since the client does not connect directly to the customer origin server. Instead, the client connects to a server on our network, and then that server connects to a customer origin server. If you would like to maintain a session for your dynamic application, we recommend that you use a cookie to identify the session. For example, a cookie could keep track of a unique ID for each client's session.
Creating a Customer Origin Configuration
This section provides step-by-step instructions on how to create a customer origin configuration.
Key information:
-
The DNS record corresponding to each hostname defined within a customer origin configuration must be fully propagated by your DNS service provider.
Check DNS record propagation via the "dig" command-line tool, which is a networking tool that queries DNS name servers for a DNS record. Add the "+trace" parameter to instruct your DNS service provider to provide a direct response on the DNS record. The syntax for this command is provided below.
dig hostname +traceIn the bottom section of the response, you should see an A record that points the specified hostname to an IP address. This indicates that the DNS record has been fully propagated. An excerpt from a sample response is shown below.
www.mycustomerorigin.com. 3600 IN A 10.10.10.101
mycustomerorigin.com. 3600 IN NS dns02.dnsauthority.com.
mycustomerorigin.com. 3600 IN NS dns01.dnsauthority.com.
;; Received 100 bytes from 100.100.100.101#53(100.100.100.101) in 20 ms - As a precautionary measure, it is recommended to set a hostname's DNS TTLDefines the length of time, in seconds, that a DNS record will be cached by a recursive nameserver. to a low value until you have confirmed that our edge servers can properly communicate with the origin server. A low DNS TTL reduces the amount of time that an improper DNS configuration will affect your origin server, while increasing the number of DNS queries sent to your DNS service provider.
-
The required options for a new customer origin are a directory name, a hostname/IP address, and a HTTP host header. For your convenience, the HTTP host header is automatically populated when you add the first hostname/IP address.
A validation path must also be specified when creating a customer origin on the ADN platform.
- Make sure that the firewall for your web servers does not restrict access to the IP address blocks listed within the Whitelist IP Blocks section of the Customer Origin page.
- It may take up to an hour for your new customer origin configuration to take effect.
The maximum number of customer origin configurations per platform is 100.
To create a customer origin configuration
-
Navigate to the Customer Origin page
How? -
In the Directory Name option, type the name of the directory that will be associated with the desired customer origin server.
The specified name will become a URL segment within the CDN URLSample URL: http://wpc.0001.edgecastcdn.net/800001/DirectoryName.
-
Perform the following steps to provide access to content stored on your customer origin server through the HTTP protocol:
- Make sure that the HTTP Edge Protocol option is marked.
- Set the Hostname or IP Address option to one of the following:
- http://Hostname:port
- http://IPAddress:port
- Click Add.
- Repeat steps ii and iii until you have finished adding all of the web servers that will be associated with this customer origin for http:// requests.
HTTPS support requires the configuration of the HTTPS Edge Protocol option. Please contact your CDN account manager to request HTTPS support.
Learn more. - Verify or set the HTTP Host Header option to one of the following:
- A hostname defined in step 3.
- An edge CNAME whose configuration points to this customer origin.
- Blank. The request will determine the value assigned to the Host request header.
- ADN: Perform the following steps when creating a customer origin configuration for the ADN platform:
Upload a sample asset to each server that has been specified for this customer origin configuration.
Our servers use this asset to choose the optimal ADN Gateway servers and data routes for your customer origin configuration. The optimal file size for this sample asset is 5 KB.
In the Validation Path option, specify a URL that points to a sample asset on your customer origin server.
The hostname specified in this URL should match the one defined in the HTTP Host Header option unless that option has been set to blank.
- Click Validate. If the result returns "200 OK" for all hostnames/IP addresses, then proceed to the next step.
-
Origin Shield Only: Origin Shield, which must be purchased separately, is available on the HTTP Large and HTTP Small platforms.
-
Set up origin shield on a customer origin by performing the following steps:
- Mark the Enable Origin Shield option.
-
Perform one of the following:
- Set up a recommended origin shield configuration by selecting the Single POP option. You should then select the POP closest to your customer origin server(s) from the ALL POPs list.
-
Create a custom origin shield configuration by selecting the Multiple POPs option and then selecting the origin shield action that will take place for each region.
- Set up a customer origin to handle all requests that are not served from cache by clearing the Enable Origin Shield option.
-
- Click Add to save your customer origin configuration.
Modifying a Customer Origin Configuration
A customer origin configuration can be modified at any time by clicking the ![]() next to the desired customer origin. The configuration associated with that customer origin will appear. Simply make the desired changes and then click Update to apply them.
next to the desired customer origin. The configuration associated with that customer origin will appear. Simply make the desired changes and then click Update to apply them.
If an edge CNAME points to a customer origin configuration, then you will not be allowed to modify the name of the folder associated with that customer origin configuration. If you would like to change the folder name, you will need to first delete the associated edge CNAME.
It may take up to an hour for changes to your customer origin configuration to take effect.
Deleting a Customer Origin Configuration
A customer origin configuration can be deleted at any time by clicking the ![]() next to the desired customer origin. Once you have confirmed the deletion, it will be removed from the list.
next to the desired customer origin. Once you have confirmed the deletion, it will be removed from the list.
If an edge CNAME points to a customer origin configuration, then you will not be allowed to delete the associated customer origin configuration. If you would like to delete it, you will need to first delete the associated edge CNAME configuration.
It may take up to an hour for customer origin configuration deletions to take effect.
More Information
- Tutorial: How to Deliver Content over HTTP
- Creating an Alias for a CDN URL
- Frequently Asked Questions - Origin Shield
- CDN Request Explained
- Response (Response Headers)
- QUIC (Rules Engine feature)
- HTTP Variables
- Amazon Web Services - S3
Edgecast CDN